Compilation and Building
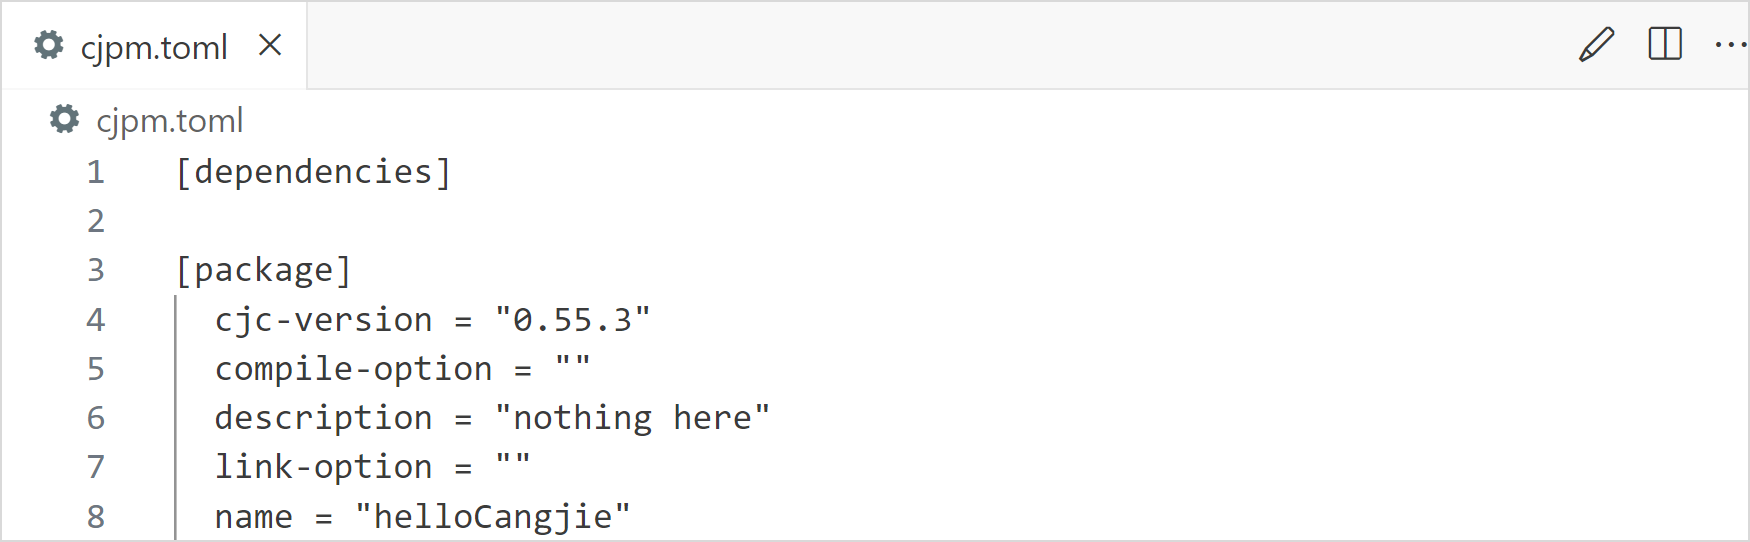
The compilation and building capabilities of the Cangjie project provided in VSCode depend on the cjpm tool. This tool requires that the module of the opened Cangjie project contain standard cjpm.toml file. If the file does not exist, you can run the cjc command on the terminal to compile the project.
In VSCode, you can run commands on the command palette, run commands on the terminal, click the Run button to run a project, or click the Hammer button to compile a project.
Compilation Modes
Running Commands on the Command Palette
In VSCode, press F1 or press Ctrl + Shift + P (Command + Shift + P for macOS) to open the command palette. Enter Cangjie to quickly find the following compilation commands.
-
Select
Cangjie: Parallelled Buildto perform parallel compilation.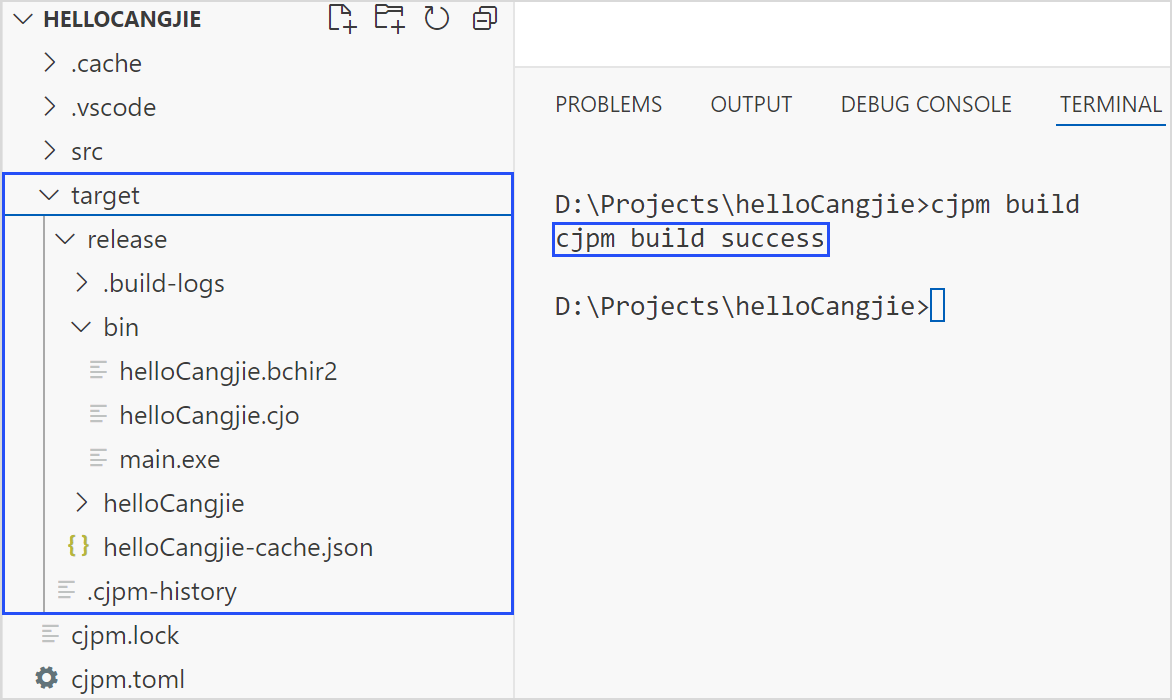
After parallel compilation is performed, the
targetdirectory is generated in the project folder. Areleasefolder is available in thetargetdirectory. Thereleasefolder contains three directories:.build-logsdirectory,bindirectory, and a directory with the same name as the project. Thebindirectory stores executable files (the executable files are generated only whenoutput-typeofcjpm.tomlis set toexecutable). The directory with the same name as the project stores the intermediate files generated during compilation.The information about whether the compilation is successful is displayed on the output panel.
-
Select
Cangjie: Build With Verboseto perform compilation and display compilation logs.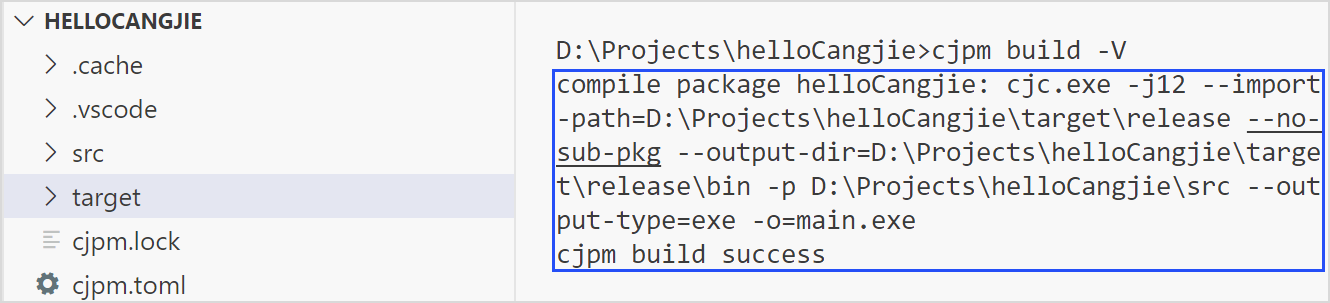
In addition to compilation, this compilation parameter also prints compilation logs.
-
Select
Cangjie: Build With Debugto generate the target file of the debug version.The compilation result of this command contains debug information for debugging.
-
Select
Cangjie: Build With Coverageto generate coverage information.The compilation result of this command contains coverage information.
-
Select
Cangjie: Build With Aliasto perform compilation and specify the name of the output executable file.
After you run this command and press Enter, an input box is displayed. You need to assign a new name to the project compilation result. This command is valid only when
output-typeofcjpm.tomlis set toexecutable. -
Select
Cangjie: Build With Incrementto perform incremental compilation.This command is used to specify incremental compilation.
-
Select
Cangjie: Build With CustomizedOptionto transparently transmit commands in thecjpm.tomlfile by condition.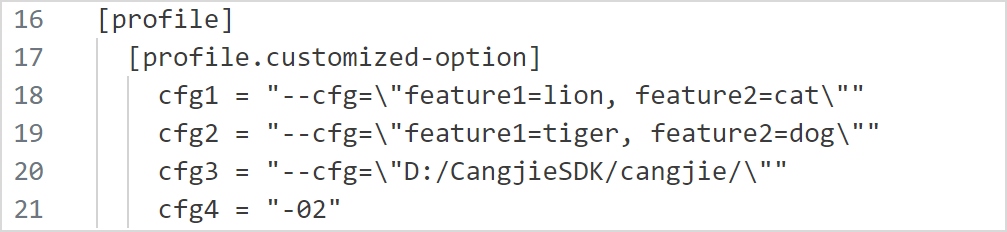
To use this option, you need to configure the
customized-optionfield in thecjpm.tomlfile, enterBuild With CustomizedOptionon the command palette, and press Enter to select the required parameters. You can select multiple parameters.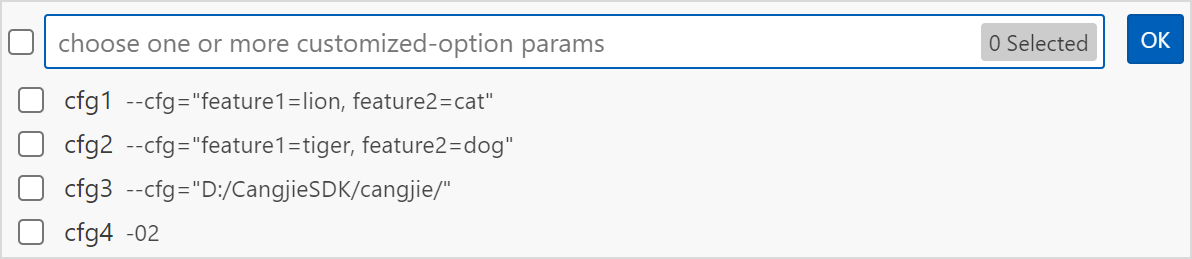
If the
customized-optionfield is not configured incjpm.tomland this command is executed, the plug-in prompts you to configure the field first. -
Select
Cangjie: Build With TargetDirto perform compilation and generate the compilation product in the specified path.After this command is executed, you can specify the output path of the compilation product. If you do not specify the path, the path specified by the
target-dirfield incjpm.tomlis used by default.
If the entered path is different from that specified by the
target-dirfield in cjpm.toml, a message is displayed, asking you whether to overwrite thetarget-dirfield in cjpm.toml. If you select Yes, thetarget-dirfield in cjpm.toml is overwritten by the entered value.
After the command is executed successfully, the compilation product is generated in the specified path.
-
Select
Cangjie: Build With Jobsto customize the maximum concurrency before compilation.You can run this command to customize the maximum concurrency before compilation. The input parameter can be any number in the range of (0, Number of CPU cores x 2].
If you enter a non-digit number in the input box, the operation is terminated, along with the message "Invalid input! The input should be number."
If the value entered in the input box exceeds the supported range (0, Number of CPU cores x 2], the number of CPU cores is used by default, and an alarm is displayed indicating that the value is out of the range.
-
Select
Cangjie: Build With CodeCheckto perform CodeCheck during compilation.When this command is executed to compile a project, CodeCheck is performed on the current project. If a required-code violation is detected, the compilation fails. If a suggested-code violation is detected, the compilation is completed normally, only with an alarm message displayed.
-
Select
Cangjie: Build With MultiParameterto perform multi-parameter compilation.When compiling a Cangjie project, you can overlay multiple parameters. To do so, find the
Build With MultiParametercommand on the command palette and select the parameters to overlay. The--targetoption may or may not appear, depending on the setting of thetargetfield incjpm.toml. If thetargetfield is not set, the--targetoption will be hidden. Similarly, the presence of--<customized-option>is determined by the setting of thecustomized-optionfield incjpm.toml. If thecustomized-optionfield is not set,--<customized-option>will be hidden.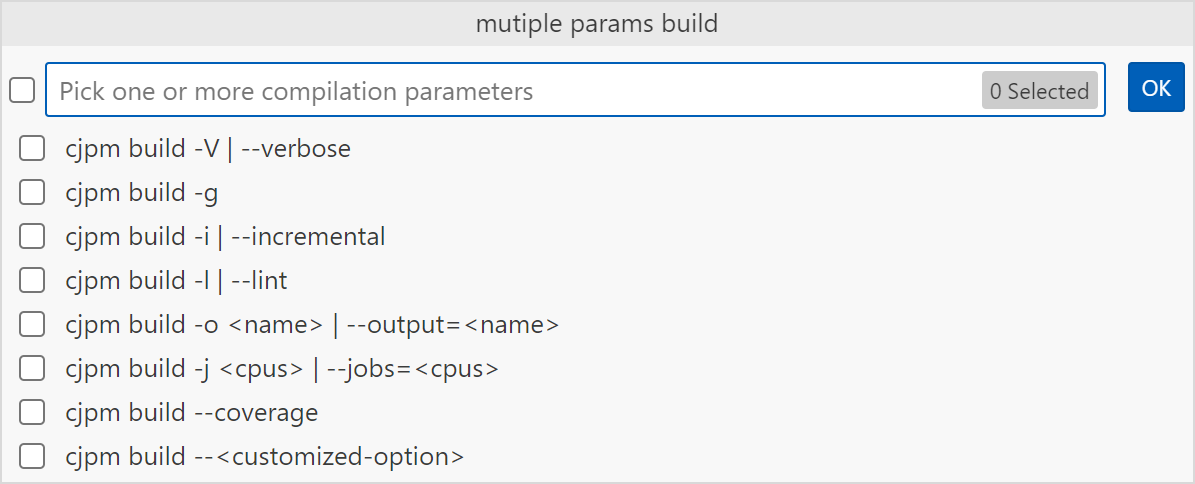
Select the parameters to be added, and then press Enter or click OK. You can also click the left arrow on the page to reselect compilation parameters.
If
cjpm build --output=<name>is selected, you need to enter an alias string and press Enter to run the command.
If
cjpm build --target=<name>is selected, you can select a platform for cross compilation.If
cjpm build --<customized-option>is selected, you can select the transparent transmission parameter.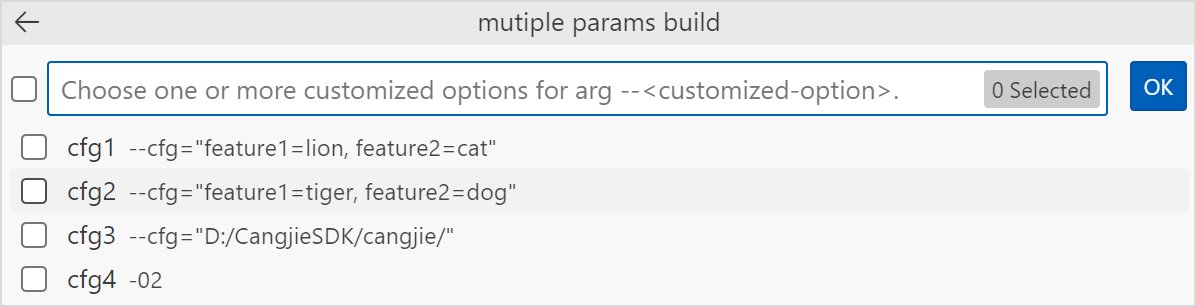
The compilation result of the add command is the sum of the execution results of these commands.
-
Select
Cangjie: Update Cjpm.tomlto update the cjpm.lock file.After modifying the
cjpm.tomlfile, you need to run this command to update thecjpm.lockfile. If you modify thecjpm.tomlfile on the UI, you do not need to manually perform this operation. -
Select
Cangjie: Execute Test Fileto compile the unit test product, execute the corresponding unit test case, and print the test result. -
Select
Cangjie: Test With NoRunto compile the corresponding test product. -
Select
Cangjie: Test With SkipBuildto execute the test product if the test product exists. -
Select
Cangjie: Test With Jobsto customize the maximum concurrency before executing the unit test. The operation is the same asBuild With Jobs. -
Select
Cangjie: Test With MultiParameterto execute the unit test with multiple parameters.After selecting this option, you can specify a package path, module, or member to execute the unit test. The member selection option is displayed only when the workspace is open.
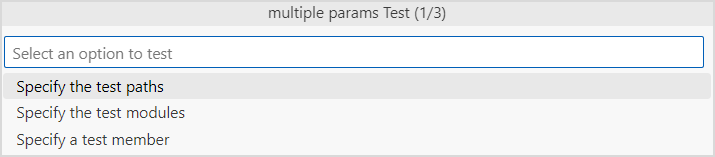
By selecting the
Specify the test pathsoption, you can specify the paths of the packages to be tested. If you prefer not to specify any, simply press Enter.
In this step, you can enter the paths of multiple packages and separate them with spaces to conduct concurrent unit tests on these packages.

By selecting the
Specify the test modulesoption, you can specify the modules to be tested. If you prefer not to specify any, simply press Enter.
In this step, you can enter the paths of multiple modules and separate them with spaces to conduct concurrent unit tests on these modules.

By selecting the
Specify a test memberoption, you can specify the member to be tested. If you prefer not to specify it, simply press Enter.
Select the parameters to be added.
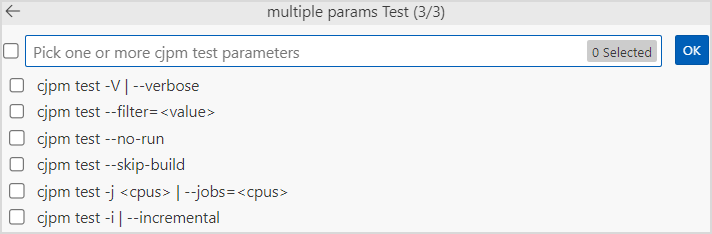
If
--filter=<value>is selected, you need to enter the expression for filtering the test subset.
The complete
cjpm testcommand can be executed after the expression for filtering the test subset is entered. The execution result is displayed on the Output panel.If
targetandcustomized-optionare set incjpm.toml, the--target=<name>and--<customized-option>parameters will be available.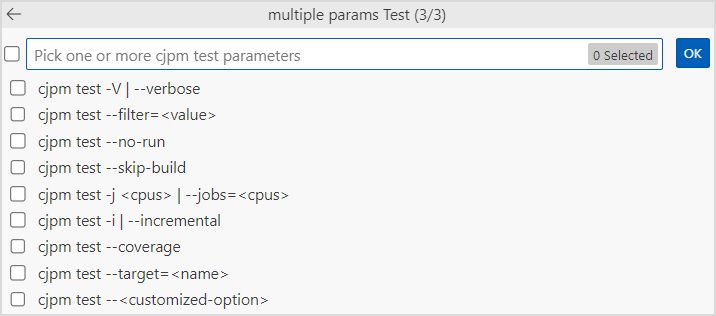
If
--target=<name>is selected, you need to select the corresponding platform.
If
--<customized-option>is selected, you need to select customized options.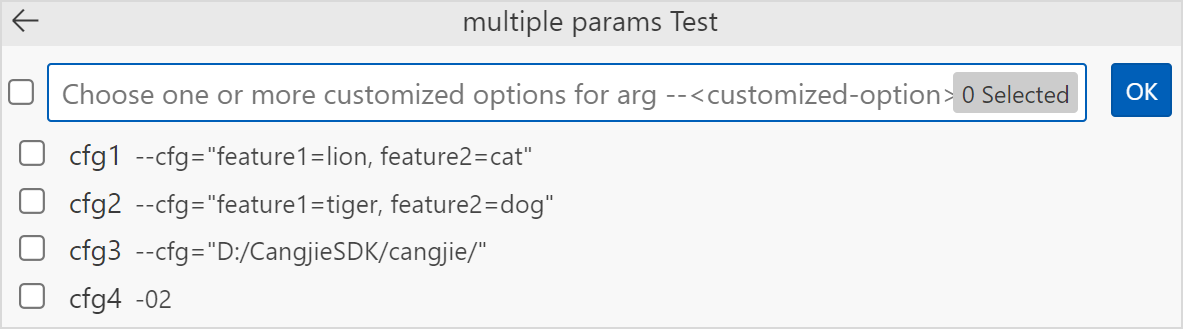
-
Select
Cangjie: Clean Build Resultto clear the compilation result (in the build directory of the project). -
Select
Cangjie: Check Circular Dependenciesto detect file dependencies. -
Select
Cangjie: Edit Configuration (UI)to open the configuration UI. -
Select
Cangjie: Install With Verboseto display installation logs. -
Select
Cangjie: Install With Debugto generate the installation product of the debug version. -
Select
Cangjie: Install With RootPathto specify the installation path of the executable file.After selecting this option, enter the desired installation path in the displayed input box. The executable file will then be installed in that path. If not configured, the default path is
$HOME/.cjpmfor Linux OS and macOS, and%USERPROFILE%/.cjpmfor Windows OS.
-
Select
Cangjie: Install With TargetDirto specify a path for storing the compilation product.Prior to installing an executable file, you must first compile it. After selecting this option, enter the desired path in the displayed input box. The compilation product will then be stored in that path.

-
Select
Cangjie: Install With Aliasto specify the name of the product to be installed.After selecting this option, enter the desired product name in the displayed input box.

-
Select
Cangjie: Install With Gitto install products from a remote Git code repository.After selecting this option, enter the URL of the remote Git code repository in the displayed input box.

After entering the URL, you can press Enter to select a branch, tag, or commit in the remote Git code repository.
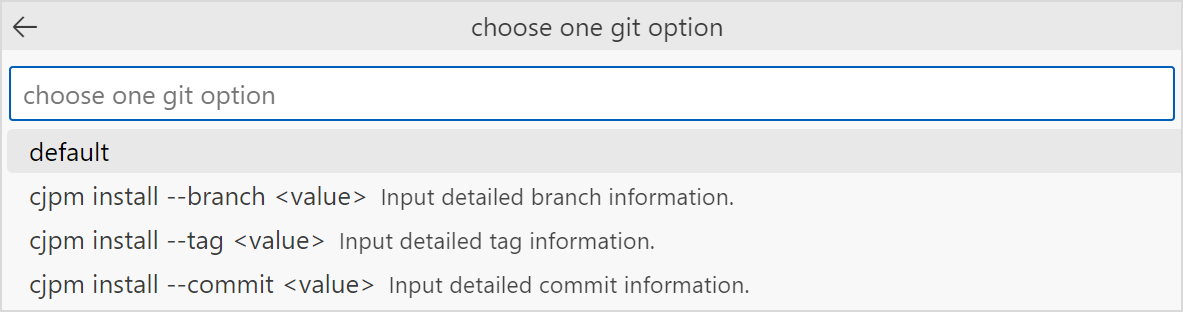
Select the branch/tag/commit number option. In the displayed input box, enter a branch, tag, or commit number to install products from the remote Git code repository.
-
Select
Cangjie: Install With Listto print the list of installed products. -
Select
Cangjie: Install With SkipBuildto skip the compilation phase and directly install products. Only use this option when the project has completed compilation. -
Select
Cangjie: Install With Jobsto specify the maximum concurrency for compilation.After selecting this option, enter the desired maximum concurrency in the displayed input box.

-
Select
Cangjie: Install With CustomizedOptionto transparently transmit commands incjpm.tomlby condition.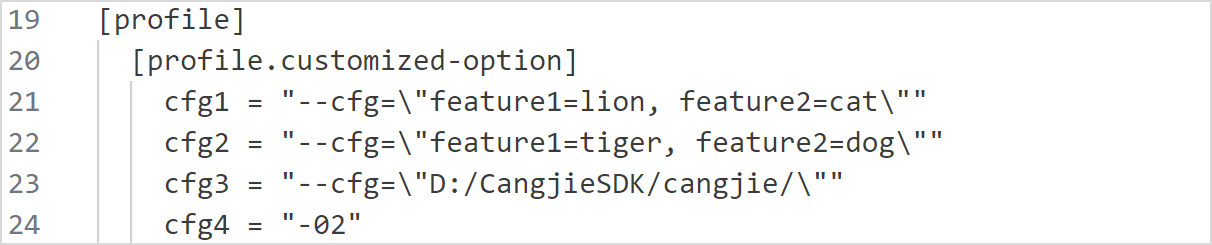
To use this option, you must first set the
customized-optionfield incjpm.toml. Then selectInstall With CustomizedOptionfrom the command palette, press Enter, select the required parameters (you can select multiple parameters), and press Enter once more.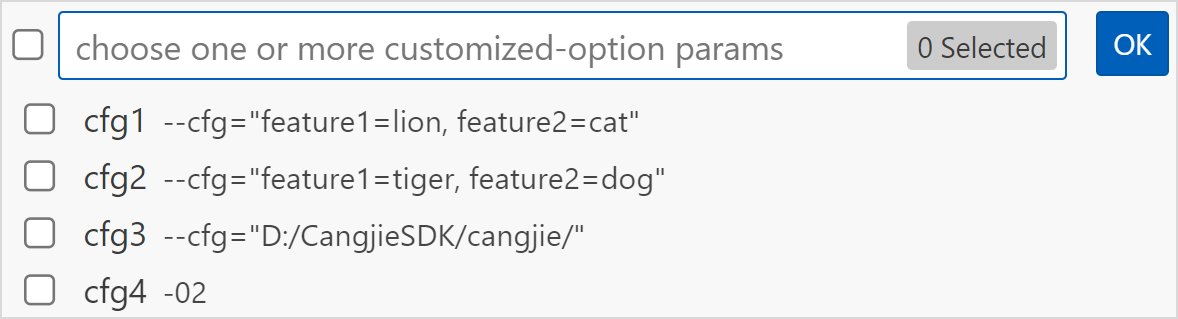
To run this command, you must first set the
customized-optionfield incjpm.toml. -
Select
Cangjie: Install With SkipScriptto avoid compiling and running the build script for the module being installed. -
Select
Cangjie: Install With CustomParameterto execute custom parameter options in the installation command.Click the gear icon button in the lower left corner of VSCode and choose Settings. Alternatively, right-click a plug-in and choose Extension Settings from the shortcut menu. Enter Cangjie in the search box and select Cangjie Language Support on the sidebar. In the
Cangjie: Cjpm Install: Customtext box, enter the command options related tocjpm install, such as-V -g --name \<value\>. Then selectInstall With CustomParameterfrom the command palette. The content in the text box is populated tocjpm install.
-
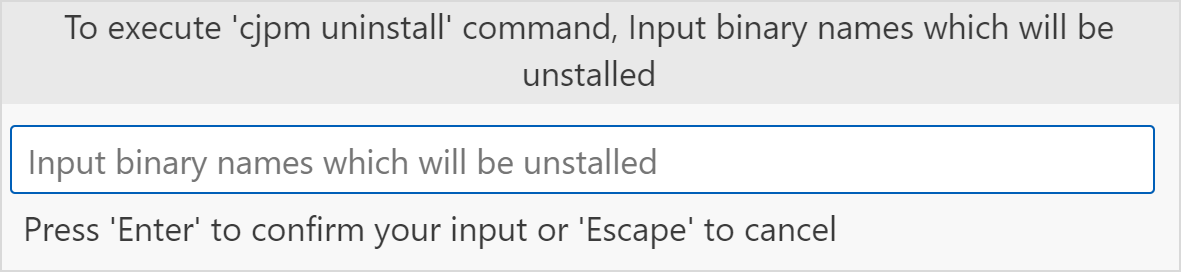
Select
Cangjie: Uninstall Binaryto uninstall the Cangjie project and delete the corresponding executable file and dependency file.After selecting this command, enter the name of the executable file in the displayed input box.
-
Select
Cangjie: Uninstall With Rootto specify the target path to be searched during uninstallation.After selecting this command, enter the target path in the displayed input box. The specified executable file and dependency file will be uninstalled from that path. If not configured, the default path is
$HOME/.cjpmfor Linux OS and macOS, and%USERPROFILE%/.cjpmfor Windows OS.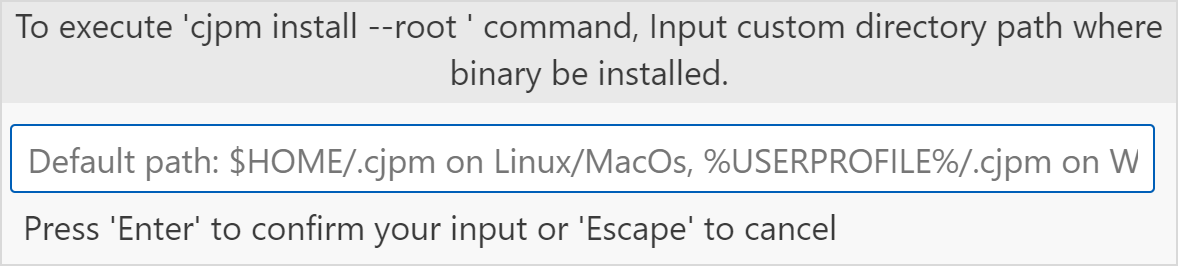
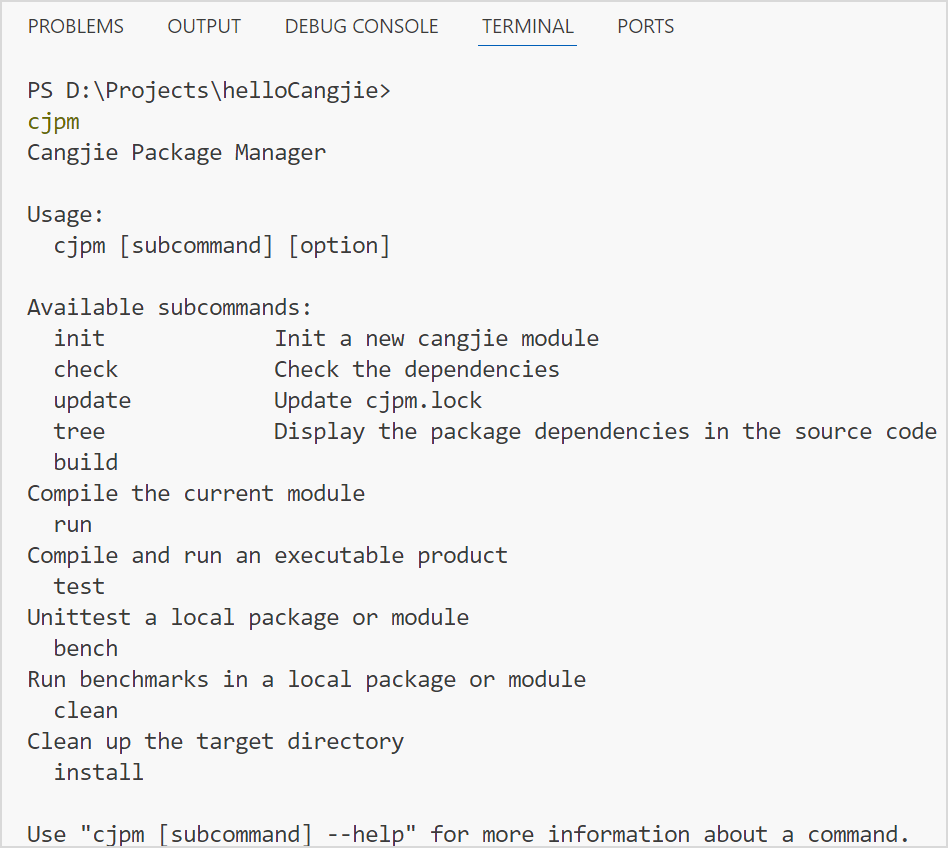
Running Commands on the Terminal
You can run the cjpm command on the VSCode terminal panel to compile a Cangjie project. If it is the first time that you use VSCode, you need to restart the VSCode to perform the cjpm operation on the terminal.
Clicking the Run Button to Run a Project
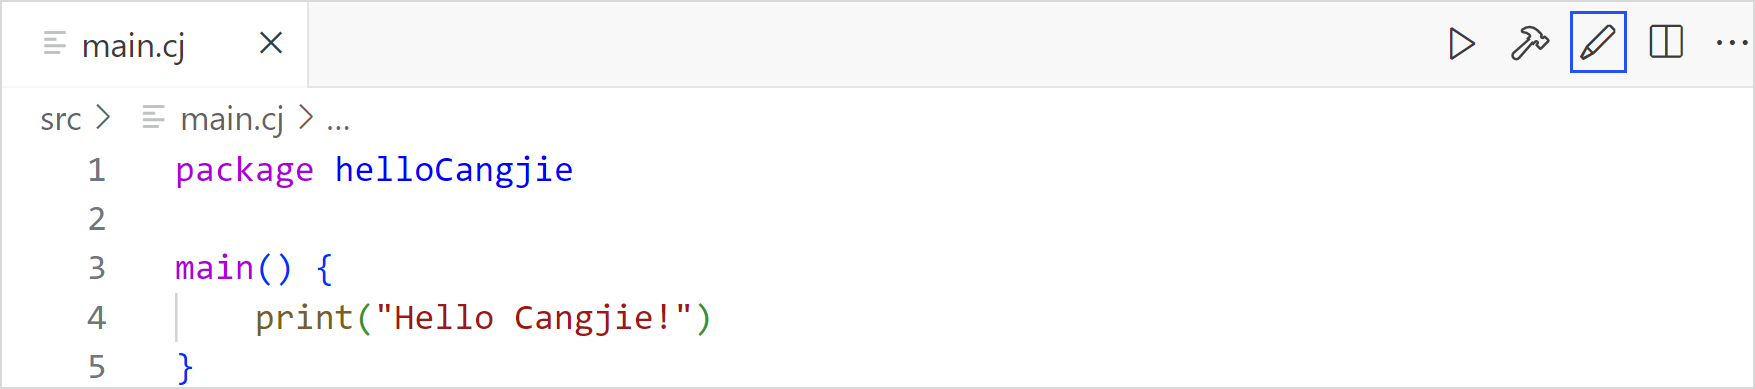
You can click the Run button in the .cj file editing area to run the entire Cangjie project.

If output-type is set to executable for the entire project, the running result is displayed on the terminal panel. Otherwise, only the compilation result is displayed.
The compilation process executed by clicking the Run button is based on the configurations of the cjpm.toml file and cjpm_build_args.json.
Clicking the Hammer Button to Compiling a Project
You can click the Hammer button in the .cj file editing area to compile the entire Cangjie project.

The compilation process performed by clicking the Hammer button is the same as that performed by clicking the Run button, and is also performed based on the configurations of the cjpm.toml file and cjpm_build_args.json. The difference is that if output-type is set to executable for the entire project, the entire project is executed after the compilation performed by clicking the Run button is complete, whereas the project is not executed after the compilation performed by clicking the Hammer button is complete.
Configuring Build Parameters in a Visualized Style
During compilation, you need to configure the cjpm.toml and cjpm_build_args.json files in the project directory in one of the following ways.
- Directly modify the
cjpm.tomlandcjpm_build_args.jsonfiles.
- Press F1 or press Ctrl + Shift + P (Command + Shift + P for macOS) to open the command palette. Run the
Cangjie: Edit Configuration (UI)command on the command palette to open the visualized edit UI.

- Click the brush icon in the upper right corner of the edit page to go to the visualized edit UI.
For the cjpm_build_args.json configuration in the .vscode directory of the project file, you can check or enter the parameters to be used for compilation. The modifications are synchronized to the cjpm_build_args.json file.
For the cjpm.toml file configuration in the project, you can enter the content and move the cursor out of the input box for the configuration to take effect in the cjpm.toml file.
Note:
When the
cjpm.tomlfile and parameter configuration UI of the Cangjie project are displayed in the editing area of VSCode at the same time, modifications to thecjpm.tomlfile are not synchronized to the UI.
For the build parameter cross-compile-configuration, you can click Add Configuration in cross-compile-configuration to add options.
Set key and compile-option, and click the Tick button or press Enter to synchronize with the cjpm.toml file. To delete a configuration, click the Cross button corresponding to the configuration.
If you click the Tick button or press Enter without setting the first field key in the added configuration, a message is displayed, indicating that the first field needs to be set. In this scenario, the submitted content is not synchronized to the cjpm.toml file. The configuration remains on the UI until the UI is refreshed. The content keeps consistent with that in the cjpm.toml file. package-configuration is similar to cross-compile-configuration. The following figure shows the scenario where the first field is empty in an added configuration of package-configuration.
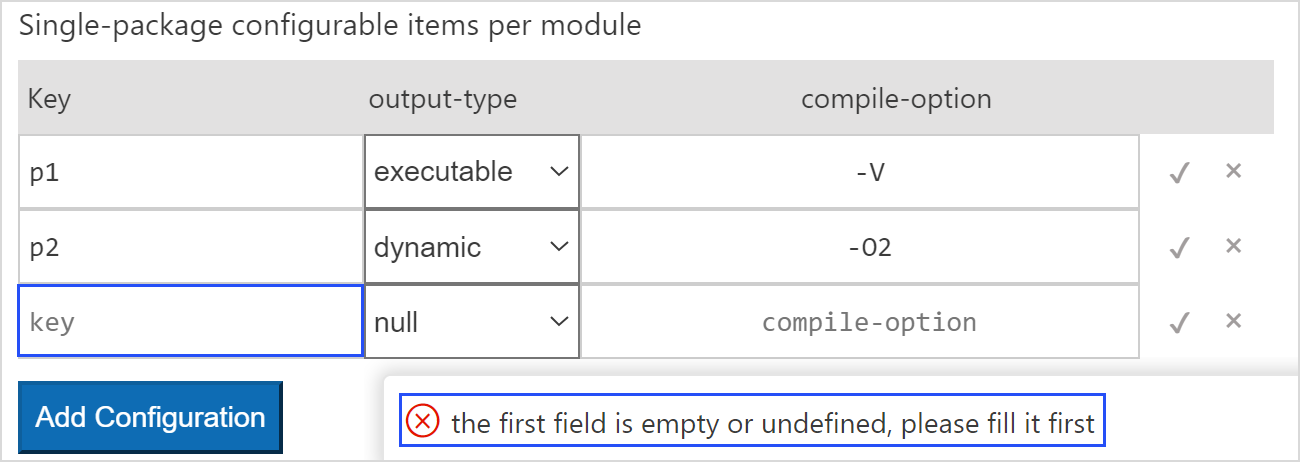
The methods for adding and modifying the package-configuration parameter is the same as those for cross-compile-configuration. The output-type field includes the following drop-down list options: executable, static, dynamic, and null. The initial type of an added configuration field is null. You can select a value as required. If the type is null, the field is deleted after it is synchronized to the cjpm.toml file.
Note:
When configuring the content of
cjpm.tomlon the UI, you only need to escape the equal sign (=) in the path specified under--cfgwithin thecustomized-optionparameter. Other symbols do not need to be escaped. For example:
When the
--cfgpath (undercustomized-option) configured on the UI includes an equal sign (=),=should be escaped, like this:--cfg="D:/projects/cang\=jie".When configuring
compile-optionfor p1 in thepackage-configurationfield on the UI, you do not need to escape the content of--link-optionscontent. Simply enclose it in quotation marks, like this:--link-options="-rpath=xxx".When editing
cjpm.tomldirectly, you need to escape all symbols. For example:
When the
--cfgpath (undercustomized-option) configured withincjpm.tomlincludes an equal sign (=), all symbols should be escaped, like this:--cfg=\"D:/projects/cang\\=jie\".When configuring
compile-optionfor p1 in thepackage-configurationfield withincjpm.toml, all symbols should be escaped, like this:--link-options=\"-rpath=xxx\".
The methods for adding and modifying the customized-option parameter is the same as those for cross-compile-configuration.
Note:
Built-in conditions cannot be set for conditions of
customized-option(@When[os = = "Linux"] cannot be used as a condition ofcustomized-option, that is, "cfg1" : "--cfg ="os=Linux"" is not allowed). Only customized conditions can be added. For details, see Conditional Compilation in Cangjie > Language Guide.
Importing Third-Party Libraries
Import Method
Note:
Third-party libraries can be imported only to the main module of the currently opened Cangjie project. For other sub-modules, the third-party libraries can be opened as projects for use.
In the Cangjie project, you can import third-party libraries and perform configuration in the cjpm.toml file.
dependencies: specifies projects on which the current Cangjie module depends. It contains the configuration information of other modules required for the current build, including the version number and path. Both of the two options need to be configured. Otherwise, the execution fails and an error is reported. You are advised to use this method to import project dependencies.
dev-dependencies: has the same usage and format as the dependencies field. This field specifies the dependencies used only during development, not the dependencies required for building the main project, for example, dependencies used only during testing. If the developer is the library author, this field should be used for dependencies that are not required by downstream users of the library.
bin-dependencies: imported as dependencies unless there are special requirements. Currently, the Cangjie plug-in supports only local bin-dependencies configuration.
Currently, package of Cangjie module dependencies can be imported in two ways. The following describes how to import three packages of the pro0 and pro1 modules.
test

├── pro0

│    ├── libpro0_xoo.so

│    ├── xoo.cjo

│    ├── libpro0_yoo.so

│    └── yoo.cjo

├── pro1

│    ├── libpro1_zoo.so

│    └── zoo.cjo

├── src

│    └── main.cj

└── cjpm.toml
Method 1: Import through package-option.
[target]
    [target.x86_64-w64-mingw32]
        [target.x86_64-w64-mingw32.bin-dependencies]
            [target.x86_64-w64-mingw32.bin-dependencies.package-option]
                pro0_xoo = "./test/pro0/xoo.cjo"
                pro0_yoo = "./test/pro0/yoo.cjo"
                pro1_zoo = "./test/pro1/zoo.cjo"
This option uses the map structure, where the name pro0_xoo is used as the key and corresponds to libpro0_xoo.so; and the path of the frontend .cjo file is used as the value. .a and .so corresponding to the .cjo file need to be placed in the same path, and the corresponding .cjo module file and the module name source file need to be placed in the same folder which cannot contain any other files or folders.
Method 2: Import through path-option.
[target]
    [target.x86_64-w64-mingw32]
        [target.x86_64-w64-mingw32.bin-dependencies]
            path-option = ["./test/pro0", "./test/pro1"]
This option is a string array structure where each element indicates the name of the path to be imported. cjpm automatically imports all Cangjie library packages meeting a specific rule in the path. The specific rule here is that the library name format is module name_package name. Packages whose library names do not meet the rule can be imported only through the package-option option.
If the same package is imported through package-option and path-option at the same time, the package-option field has higher priority.
The following figure shows the navigation bar view.
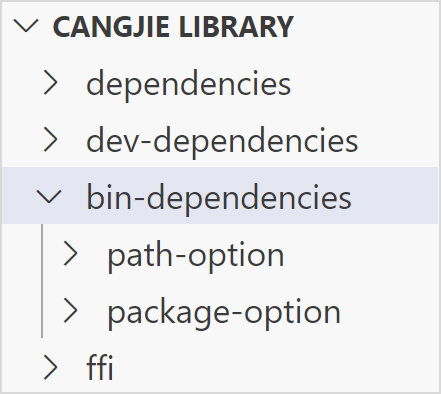
You can import the modules required by the project in the corresponding import mode subdirectories. On the navigation bar, click the brush icon to access the UI.
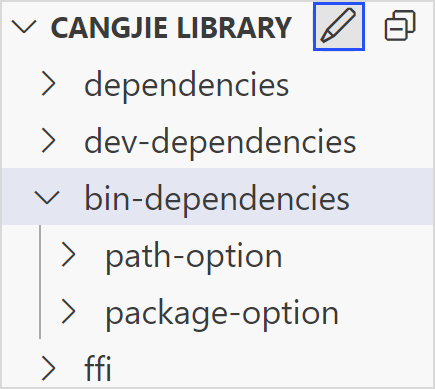
ffi: is an external C library on which the current Cangjie module depends. The information required for depending on the library is configured, including the name and path fields. CANGJIE LIBRARY in the view bar of the resource manager allows you to add such external libraries easily.
After the project is initialized, you can click the plus sign (+) next to the corresponding dependency type to add a third-party library.
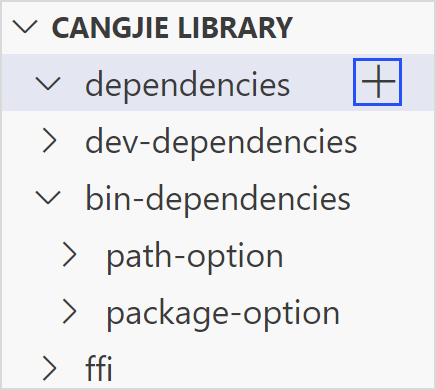
You can click the minus sign (-) on a third-party library to delete the library.
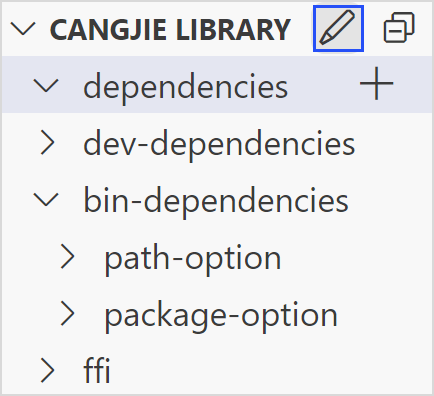
You can also click the Edit button in the view bar to open the third-party library import UI to import or delete a third-party library.
The preceding delete and add operations are all synchronized to the module.json file of the project.
Import Constraints
- If dynamic link libraries (C library and Cangjie library) are required for a project, you need to set
LD_LIBRARY_PATHand runexport LD_LIBRARY_PATH=xxx:$LD_LIBRARY_PATH. - The modification in the
cjpm.tomlfile does not directly affect treeView or UI. You need to click treeView or UI for manual update. - If you add an external library to the library category in treeView and the library category directory is closed, you need to open the directory to view the added external library.
- Currently, the fields on the UI do not support the function of displaying content on hover.
- The UI is not an external library added by developers, and its path is the same as that in the
cjpm.tomlfile. Absolute paths are displayed for libraries and treeViews added by developers.