Cangjie IDE Plug-in User Guide
Function Description
Cangjie provides the Visual Studio Code plug-in (VSCode for short). After the Cangjie plug-in and Cangjie SDK are installed in VSCode, you can use the language service, project management, compilation and building, debugging, formatting, and code coverage statistics functions. This document describes how to install the Cangjie plug-in in VSCode and how to use the functions provided by the plug-in.
Note:
The static code check capability is being built. You are not advised to perform operations related to CodeCheck. Otherwise, a message may be displayed indicating that cjlint does not exist.
Downloading Software
Download the VSCode installation package from the VSCode official website. Version 1.67 or later is recommended. To download the Cangjie plug-in, go to Cangjie download center, select the required version, and click the IDE installation package (VSCode).
| Download Item | Description | Required |
|---|---|---|
| Visual Studio Code | IDE | Yes |
| IDE installation package (VSCode) | Cangjie plug-in | Yes |
Installing VSCode
Windows
Run the VSCode installation file (for example, VSCodeUserSetup-x64.exe) and select a path as prompted to install VSCode.
Linux
Local installation
-
Decompress the downloaded package (for example, VSCode-linux-x64) and save it to a custom location.
-
Run the following command to grant the execute permission to code:
chmod 777 ./VSCode-linux-x64/code chmod 777 ./VSCode-linux-x64/bin/code -
Run the following command to start VSCode:
./VSCode-linux-x64/bin/code
Remote installation
-
Search for Remote - SSH in VSCode and click Install.

-
If you use Remote - SSH for remote work, VSCode automatically installs the server on the remote host. Currently, linux_arm64 supports only the Remote - SSH mode.
macOS
Decompress the downloaded package (for example, VSCode-darwin-universal.zip) and drag the decompressed .app file to the application to complete the VSCode installation.
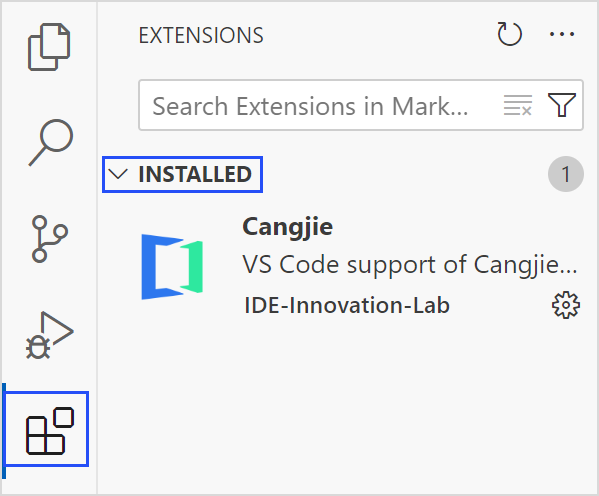
Installing the Cangjie Plug-in
Decompress the downloaded package to obtain the .vsix plug-in file.
Open the file resource manager in VSCode, find the .vsix plug-in file to be installed, and click OK.

You can view the installed plug-ins in the INSTALLED directory.
Installing the Cangjie SDK
The Cangjie SDK provides command line tools such as Cangjie Package Manager (CJPM), Cangjie compilation command (cjc), and Cangjie Formatter (cjfmt). After the Cangjie SDK is correctly installed and configured, you can use functions such as project management, compilation and building, formatting, and coverage statistics. You can download the SDK in either of the following ways:
- Offline manual installation. Download the SDK installation package from the official website and install the Cangjie SDK on the local host.
- Installation using VSCode. The Cangjie plug-in provides the functions of downloading and updating the latest Cangjie SDK. You can download the latest Cangjie SDK and deploy it in the local environment in VSCode.
Downloading SDK
You can manually download the Cangjie SDK at Cangjie download center.
Windows
For Windows, download Cangjie-version-windows_x64.exe or Cangjie-version-windows_x64.zip.
Download the SDK and save it to the local host. If the .exe file is downloaded, run the file, select the installation path as prompted, and record the path. If the .zip file is downloaded, decompress the file and record the storage path.
The directory structure of the SDK folder is as follows:
cangjie

├── bin

├── lib

├── modules

├── runtime

├── third_party

├── tools

├── envsetup.bat

├── envsetup.ps1

└── envsetup.sh
Linux
For Linux_x64, download Cangjie-version-linux_x64.tar.gz.
For Linux_AArch64, download Cangjie-version-linux_aarch64.tar.gz.
Download the SDK, save it to the local host, and record the storage path. The directory structure is as follows:
cangjie

├── bin

├── include

├── lib

├── modules

├── runtime

├── third_party

├── tools

└── envsetup.sh
macOS
For macOS_x86_64, download Cangjie-version-darwin_x64.tar.gz.
For macOS_AArch64, download Cangjie-version-darwin_aarch64.tar.gz.
Download the SDK, save it to the local host, and record the storage path. The directory structure is as follows:
cangjie

├── bin

├── lib

├── modules

├── runtime

├── third_party

├── tools

└── envsetup.sh
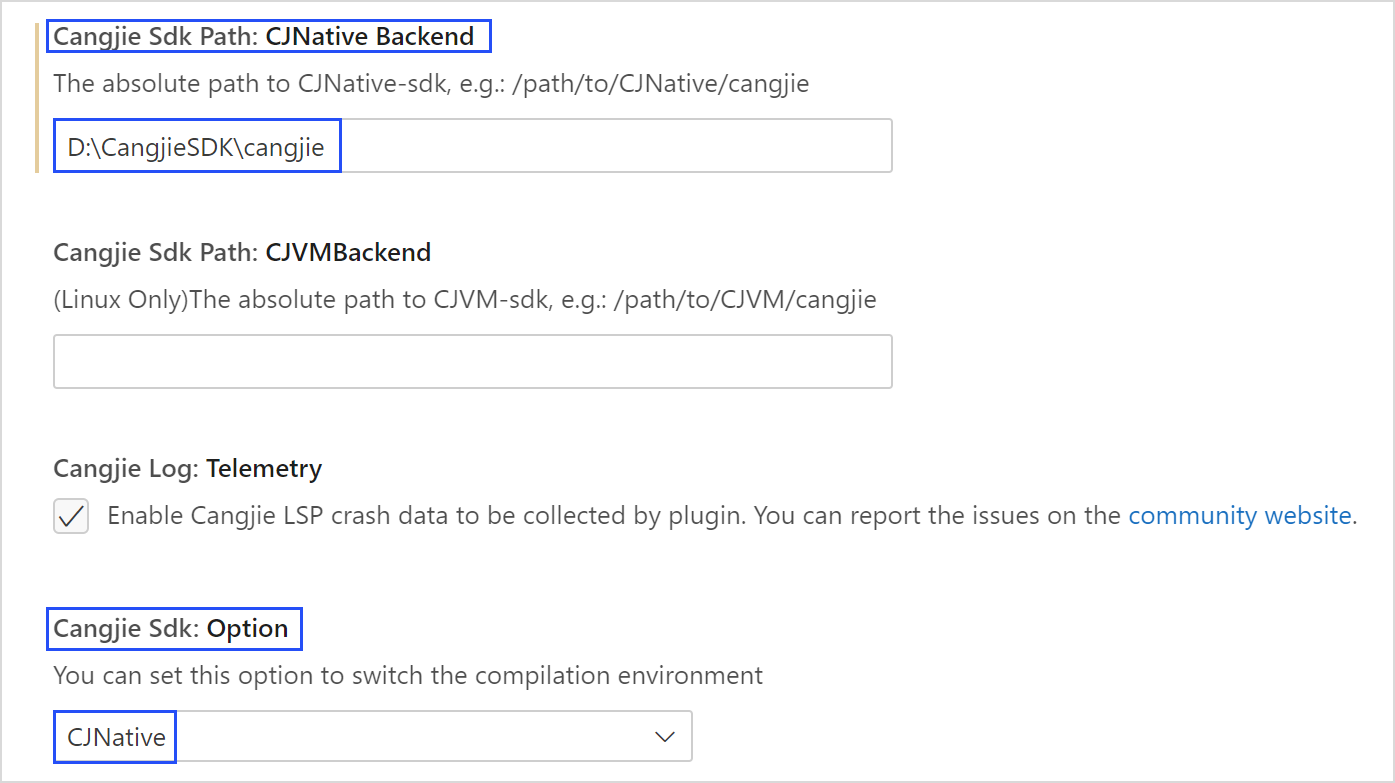
Setting SDK Path
After the Cangjie plug-in is installed, you can configure the SDK path. Click the gear icon in the lower left corner and select Settings.

Alternatively, right-click the plug-in and choose Extension Settings from the shortcut menu. The Settings page is displayed.

Enter Cangjie in the search box and select Cangjie Language Support in the sidebar.

Configuring the CJNative Backend
-
Find Cangjie Sdk: Option. Select CJNative (the default option) as the backend type.
-
Find Cangjie Sdk Path: CJNative Backend. Enter the absolute path of the CJNative backend SDK folder.
-
Restart VSCode for the modification to take effect.
Validating the Installation
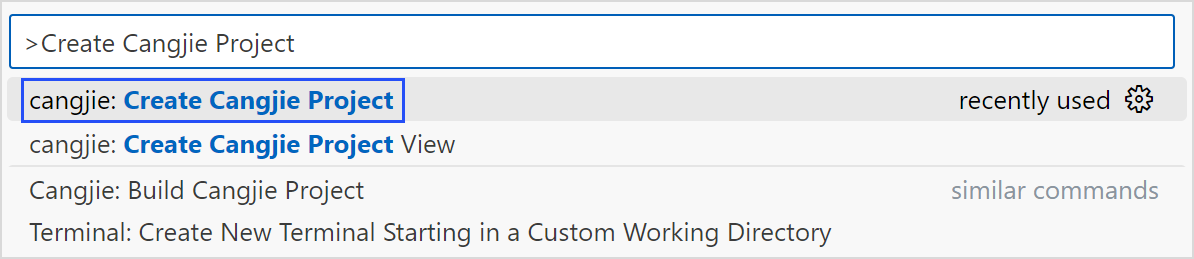
Open the VSCode command panel by pressing Ctrl + Shift + P (or Command + Shift + P in macOS), and select cangjie: Create Cangjie Project View.
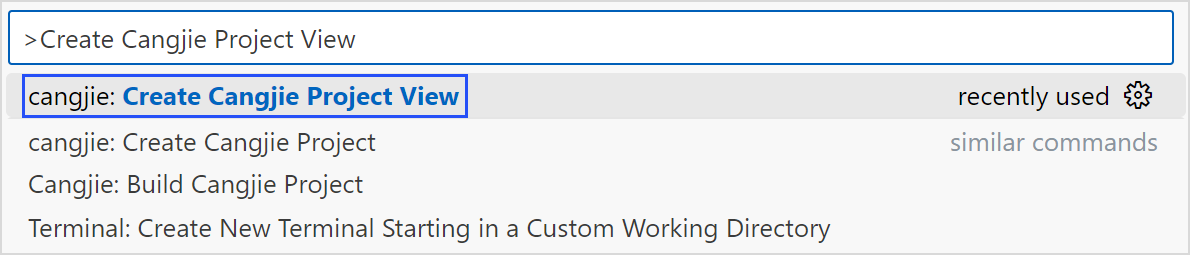
If the Create New Cangjie Project page is displayed, the Cangjie SDK is successfully installed.
Constraints
Constraint 1
The Cangjie plug-in provides language services only for the Cangjie source code in the folder opened by developers. For example, the opened folder is the root directory PROJECTROOT of the Cangjie project. If the module name is not specified, the name of the PROJECTROOT directory is used as the module name by default to facilitate the import of packages in src. PROJECTROOT/src is the source code of Cangjie in src (supporting language services). All other source code in the PROJECTROOT directory is called non-src Cangjie source code (supporting language services). The Cangjie source code outside the PROJECTROOT directory is called external source code (not supporting language services currently).
Constraint 2
Each folder in a non-src directory serves as a package. The declaration of the package name and the compilation method of the package are the same as those of the top-level package (default package) in the src directory. The Cangjie source code in the non-src directory can be imported to packages in the standard library and custom packages in the src directory. Packages in the non-src directory cannot be imported to other packages.
Constraint 3
In Linux, Windows, and macOS, you need to set the Cangjie SDK path first.
Language Service
Function Description
The language service tool provides the following functions for developers: syntax highlight, autocomplete, definition redirection, reference search, error diagnosis, selection highlight, floating prompt, signature help, and renaming.
Code Highlight
Open the .cj file in the Cangjie project in VSCode. The code is highlighted. Different themes of VSCode are highlighted in different colors. Operators, classes, comments, functions, keywords, numbers, package names, strings, and variables can be highlighted.

Autocomplete
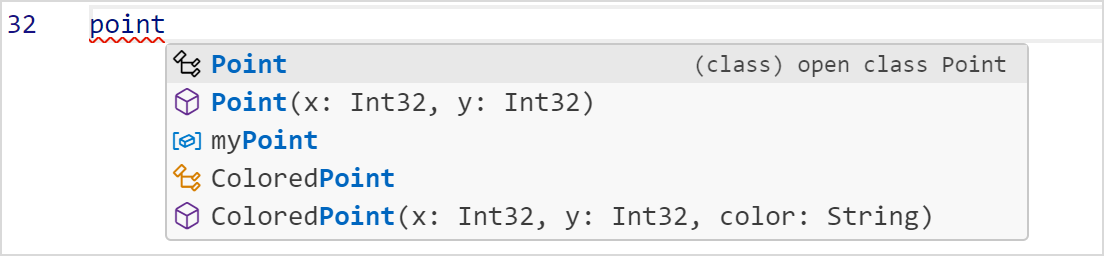
Use VSCode to open the .cj file in the Cangjie project and enter a keyword, variable, or period (.). The candidate content is displayed on the right of the cursor. Use the up and down arrow keys to quickly select the desired content (you need to switch to the default input method), and press Enter or Tab to complete the content.

Modular supplement is provided for functions with parameters or generics. That is, when a function has parameters or generics, parameter formatting completion is displayed after you select function completion, as shown in the following figure. After filling in the value, press Tab to switch to the next parameter until the modular completion is complete, or press Esc to exit the selected module in advance.

Definition Jump
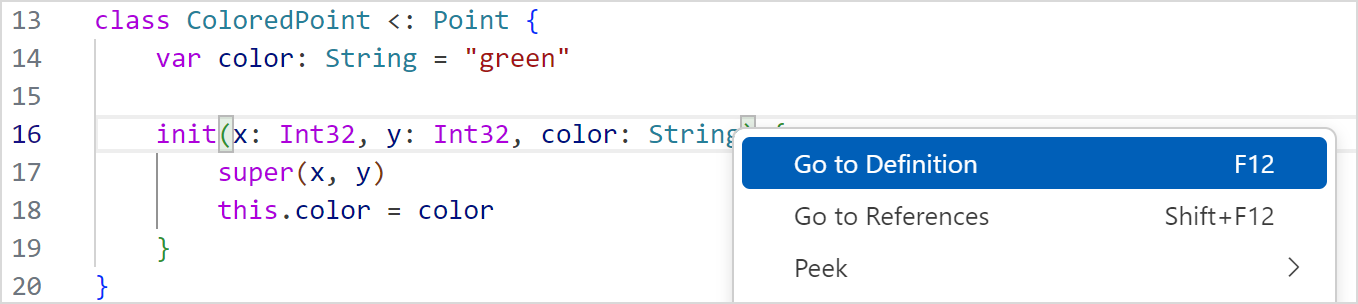
Open the .cj file in the Cangjie project in VSCode, hover the mouse pointer over the target, press Ctrl, and click the left mouse button to trigger the definition jump; or right-click the target symbol and choose Go to Definition from the shortcut menu to execute the definition jump; or press F12 to execute the definition jump.
Note
If definition jump is used at a symbol, you are redirected to the symbol definition. Cross-file jump is supported. If definition jump is used at the symbol definition, and the symbol has not been referenced, the cursor jumps to the left of the symbol. If a symbol is referenced elsewhere, a reference lookup is triggered.
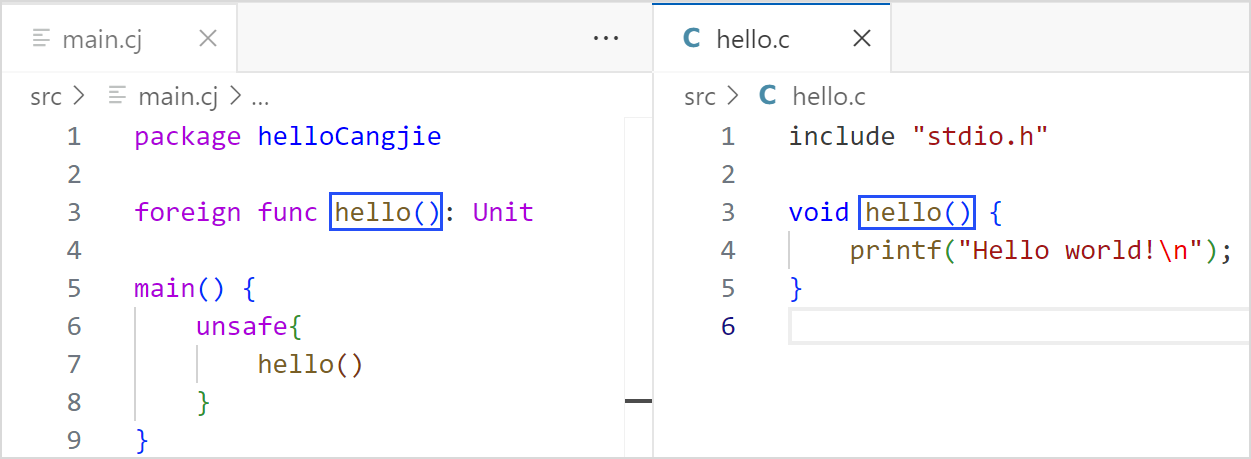
Cross-Language Redirection
The language service plug-in supports the redirection from Cangjie language to C language. You can open the .cj file in the Cangjie project in VSCode, hover the mouse pointer over the Cangjie interoperability function, press Ctrl, and click the left mouse button to trigger the definition jump; or right-click the target symbol and choose Go to Definition from the shortcut menu; or press F12 to perform the definition jump.
Prerequisites
- Huawei-developed C++ plug-in is installed on the local host.
- The directory for storing the C language source code to be redirected to is set on the Cangjie plug-in.
- The build folder is in the current project to store the compile_commands.json file (which can be generated by running the CMake command) for creating the index file of the specified folder.
Jump Effect
The foreign function searches for the corresponding C language function in the directory set by the developer. If the function is found, the function location in the C language source code is displayed. Except for the preceding scenario, the original definition redirection of the plug-in is retained.
Search for Reference
You can open the .cj file in the Cangjie project in VSCode, right-click the target symbol, and choose Find All References from the shortcut menu to preview the symbol reference. You can click a preview item to go to the corresponding reference.

Error Diagnosis
You can open the .cj file in the Cangjie project in VSCode. If the source code file contains code that does not comply with Cangjie syntax or semantic rules, a red wavy underline is displayed in the related code segment, as shown in the following figure. When the cursor hovers over the code segment, an error message is displayed. After modification, the error is automatically cleared.

Selection Highlight
You can open the .cj file in the Cangjie project in VSCode. When you move the cursor to a variable or function name, the declaration and usage of the variable in the current file are highlighted.

Floating Tips
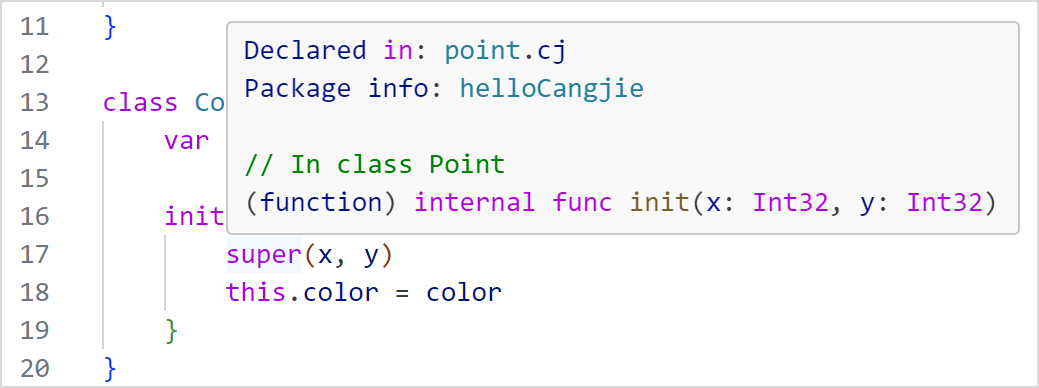
You can open the .cj file in the Cangjie project in VSCode. When the cursor hovers over a variable, the type information is displayed.
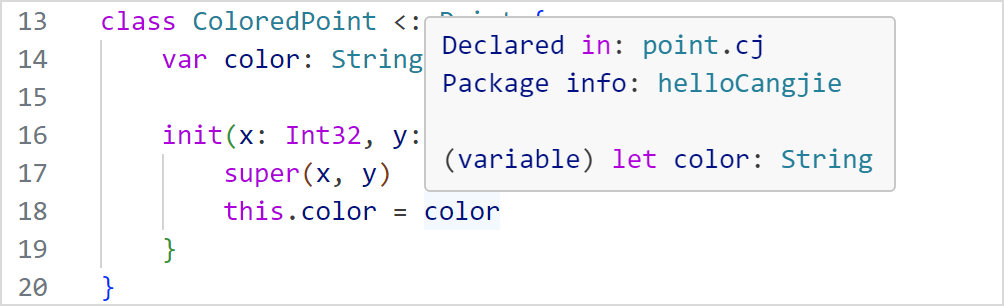
When the cursor hovers over a function name, the function prototype is displayed.
Definition Search
You can open the .cj file in the Cangjie project in VSCode, press Ctrl + T, and enter the symbol definition name in the search box that is displayed. The search result is displayed. You can click an item in the search result to go to the corresponding definition location.

Currently, the following definition types can be searched: class, interface, enum, struct, typealias, toplevel function, toplevel variable, prop, enum constructor, member function, and member variable.
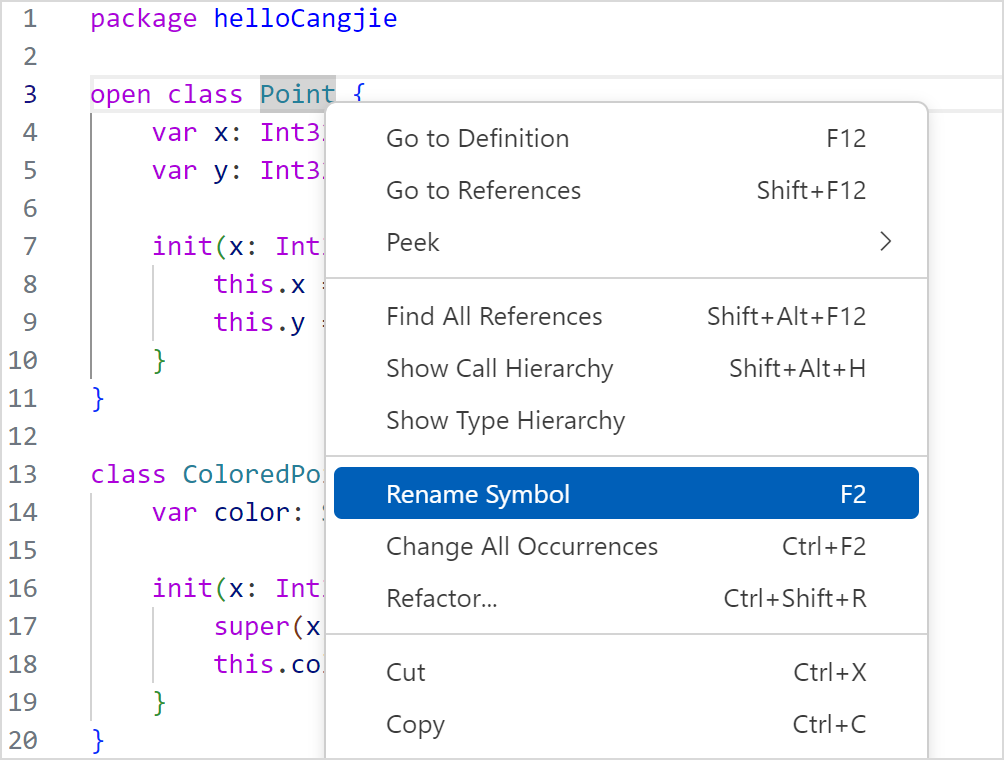
Rename
You can open the .cj file in the Cangjie project in VSCode, right-click the name to be modified, and choose Rename Symbol from the shortcut menu or press F2 to open the rename edit box.
After editing, you can press Enter to complete the renaming.

Currently, the following types can be renamed: class, interface, enum, struct, func, type, generic, variable, and custom macro.
Outline View Display
You can open the .cj file in the Cangjie project in VSCode. The outline of the current file is displayed in the OUTLINE view on the left. Currently, a two-layer structure is supported. The first layer is the declarations defined in toplevel, and the second layer is the constructors and members.

Currently, the following types can be displayed in the outline view: class, interface, enum, struct, typealias, toplevel function, toplevel variable, prop, enum constructor, member function, and member variable.
Breadcrumb Navigation
You can open any .cj file in the Cangjie project in VSCode, move the cursor to a symbol, and click the breadcrumb navigation icon. The current location of the symbol and the path of the symbol in the entire project are displayed.
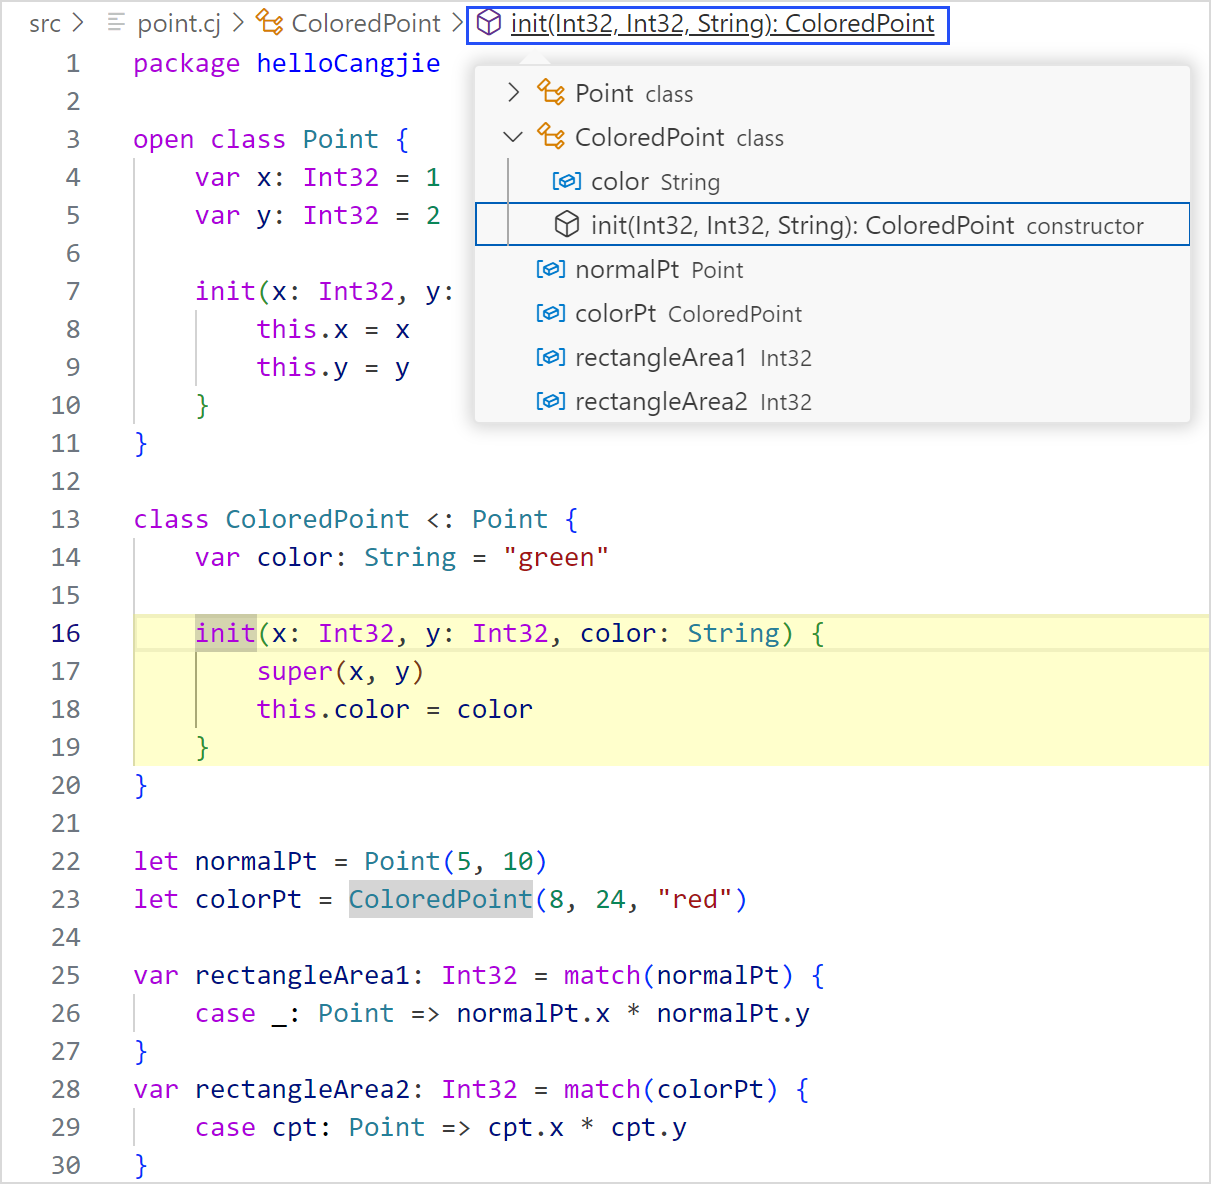
Currently, the following types support breadcrumb navigation: class, interface, enum, struct, typealias, toplevel function, toplevel variable, prop, enum constructor, member function, and member variable.
Signature Help
VSCode triggers signature help when a left parenthesis and a comma are entered. The prompt box keeps moving with the cursor as long as it is within the function parameter range. (Signature help can coexist with the autocompletion function.) As shown in the following figure, you can view the parameter information of the current function and the highlight effect of the current function location parameter.

Type Hierarchy Display
You can open the .cj file in the Cangjie project in VSCode, right-click the custom name to be viewed, and choose Show Type Hierarchy from the shortcut menu. The type hierarchy is displayed on the left. By default, the object type is the parent class of all classes and is not displayed in this function.
Currently, the following types support hierarchy display: class, interface, enum, and struct.

You can click the icon marked in the figure to switch between the subclass and parent class.

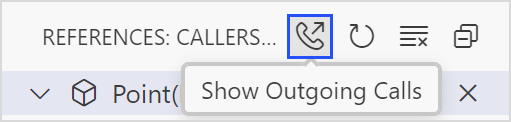
Call Type Hierarchy
You can open the .cj file in the Cangjie project in VSCode, right-click the function name, and choose Show Call Hierarchy from the shortcut menu. The call type hierarchy of the function is displayed on the left.
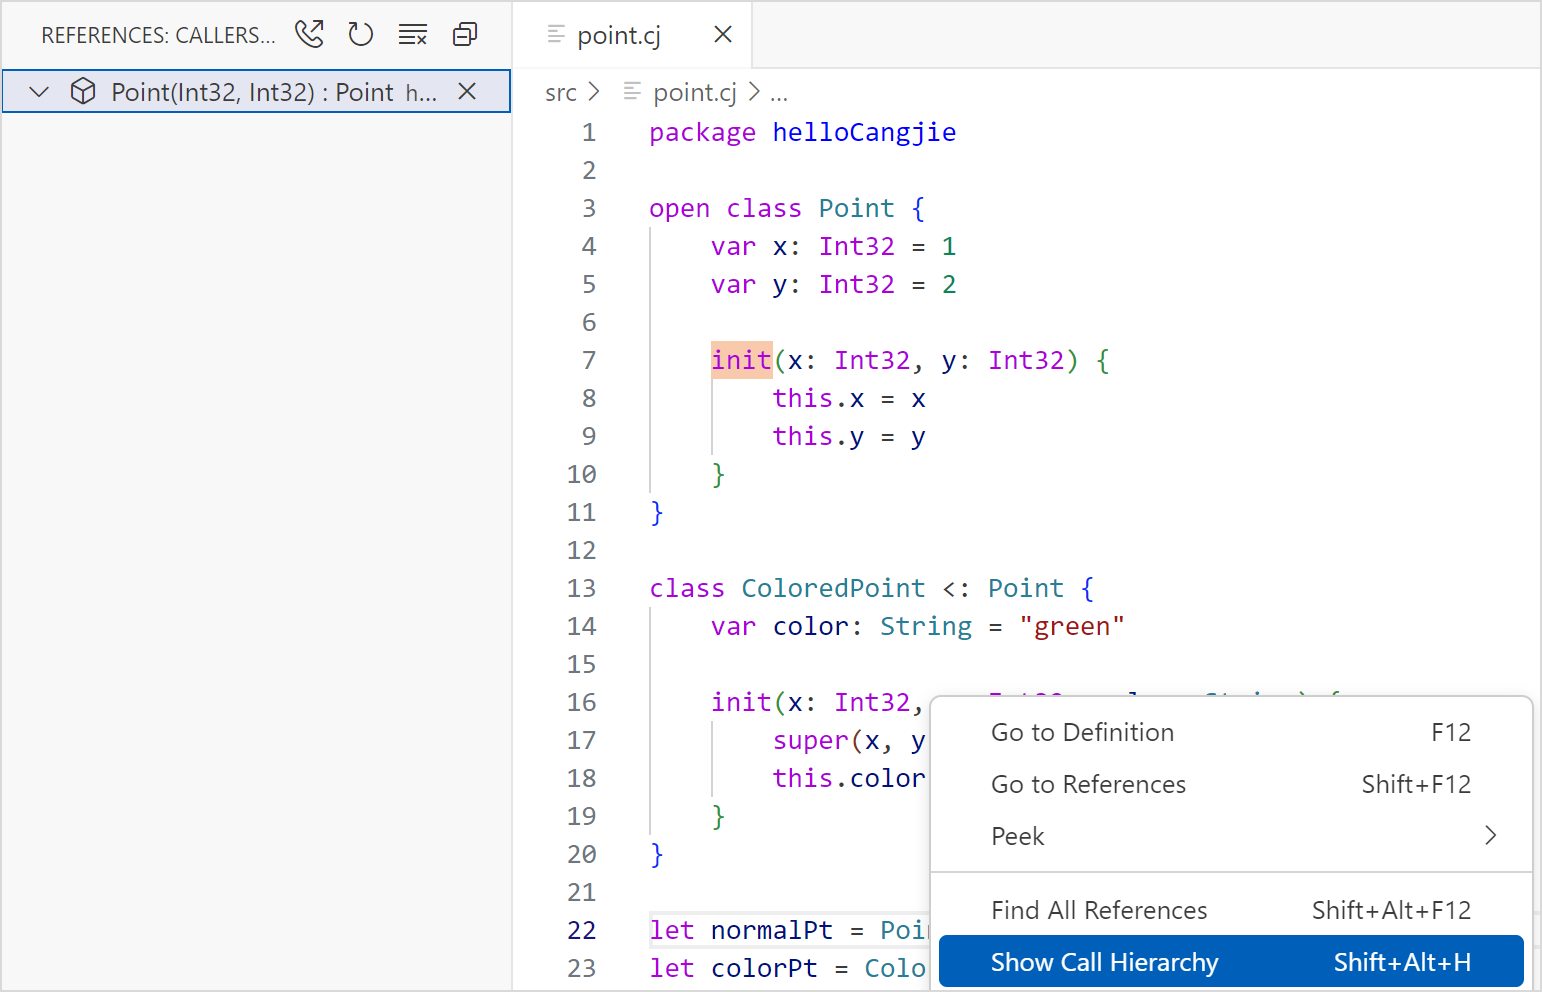
You can click the marked icon to switch between the calling function and the called function.
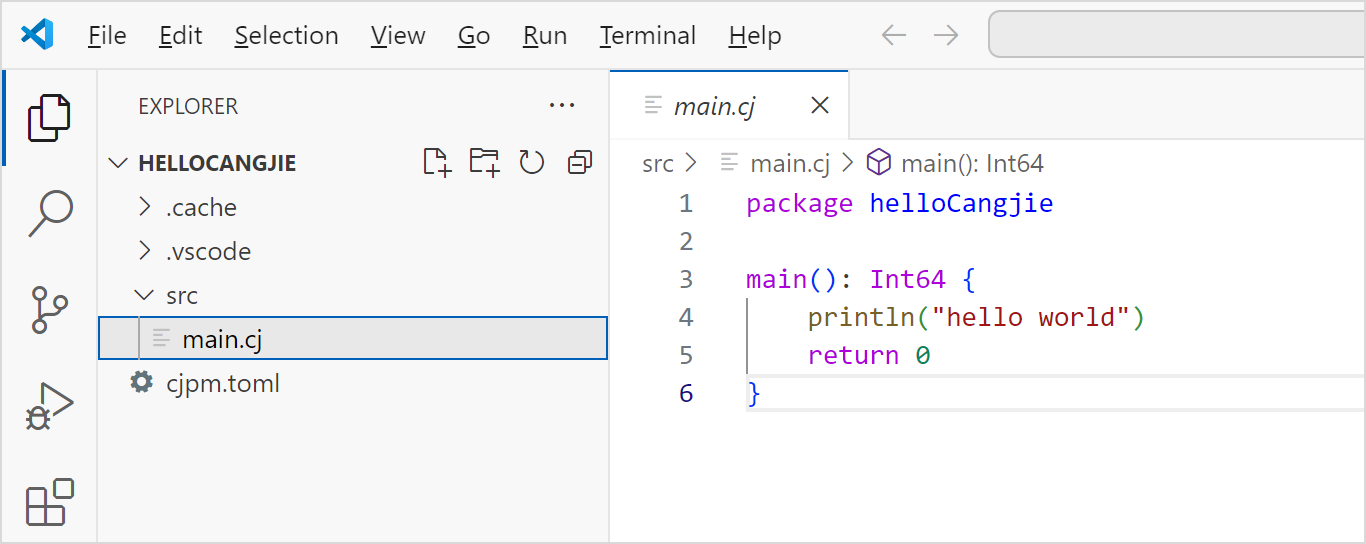
Creating a Cangjie Project
The following figure shows the directory structure of a Cangjie project.
Project_name: user-defined name

├── src: code directory

│    └── main.cj: source code file

└── cjpm.toml: default configuration file cjpm.toml
Using the VSCode Command Panel
In VSCode, press F1 or press Ctrl + Shift + P (Command + Shift + P for macOS) to open the command panel. Perform the following steps to create a Cangjie project.
Step 1: Select the command for creating a Cangjie project.
Step 2: Select Cangjie backend.

Step 3: Select a project template.

Step 4: Select a project path.

Step 5: Enter the project name.
Select a path for storing the project and enter the project name.
Step 6: Create the project and open it.
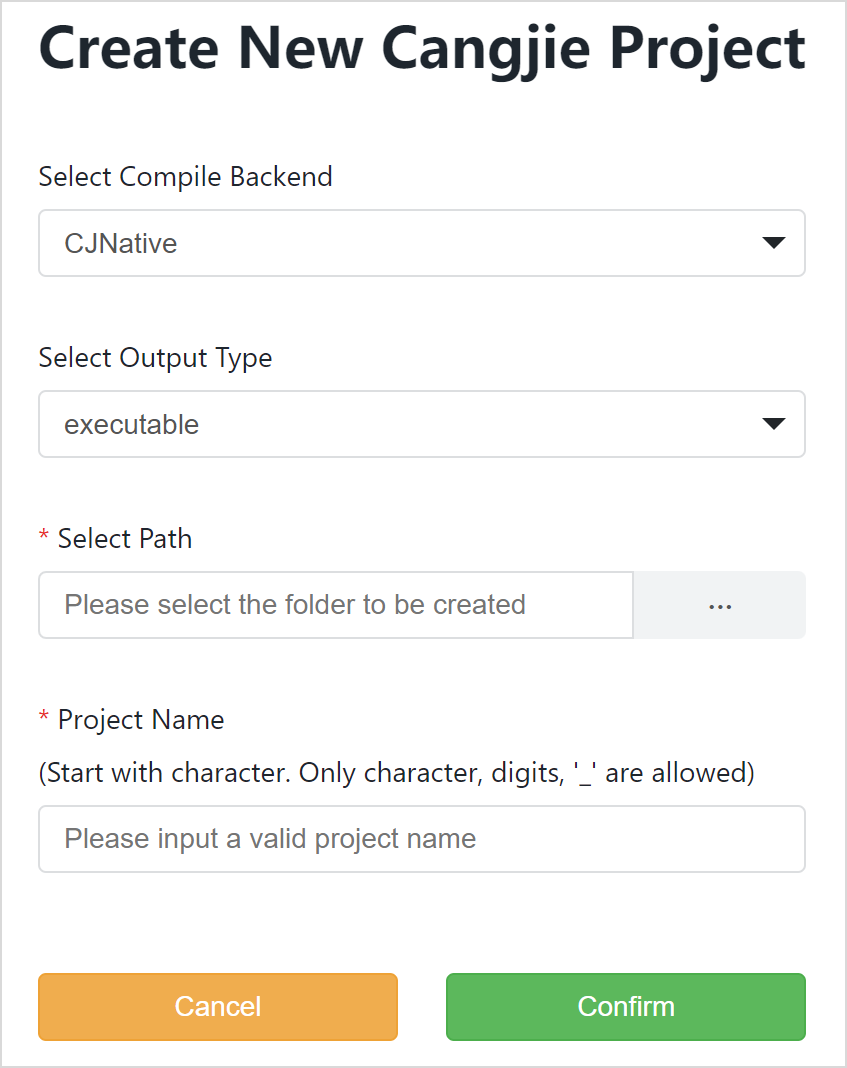
Using a Visualization View
In VSCode, press F1 or press Ctrl + Shift + P (Command + Shift + P for macOS) to open the command panel. Perform the following steps to create a Cangjie project.
Step 1: Select the command for creating a Cangjie visualization project.

Step 2: Open the Create New Cangjie Project page.

Step 3: Select a project template.
Step 4: Select a project path.
Select a path for storing the project and enter the project name.
Step 5: Enter the project name.

Step 6: Click Confirm to create and open the project.

Compilation and Building
The compilation and building capabilities of the Cangjie project provided in VSCode depend on the cjpm tool. This tool requires that the module of the opened Cangjie project contain standard cjpm.toml file. If the file does not exist, you can run the cjc command on the terminal to compile the project.
In VSCode, you can run commands on the command panel, run commands on the terminal, click the Run button to run a project, or click the Hammer button to compile a project.
Compilation Modes
Running Commands on the Command Panel
In VSCode, press F1 or press Ctrl + Shift + P (Command + Shift + P for macOS) to open the command panel. Enter Cangjie to quickly find the following compilation commands.
-
Select
Cangjie: Parallelled Buildto perform parallel compilation.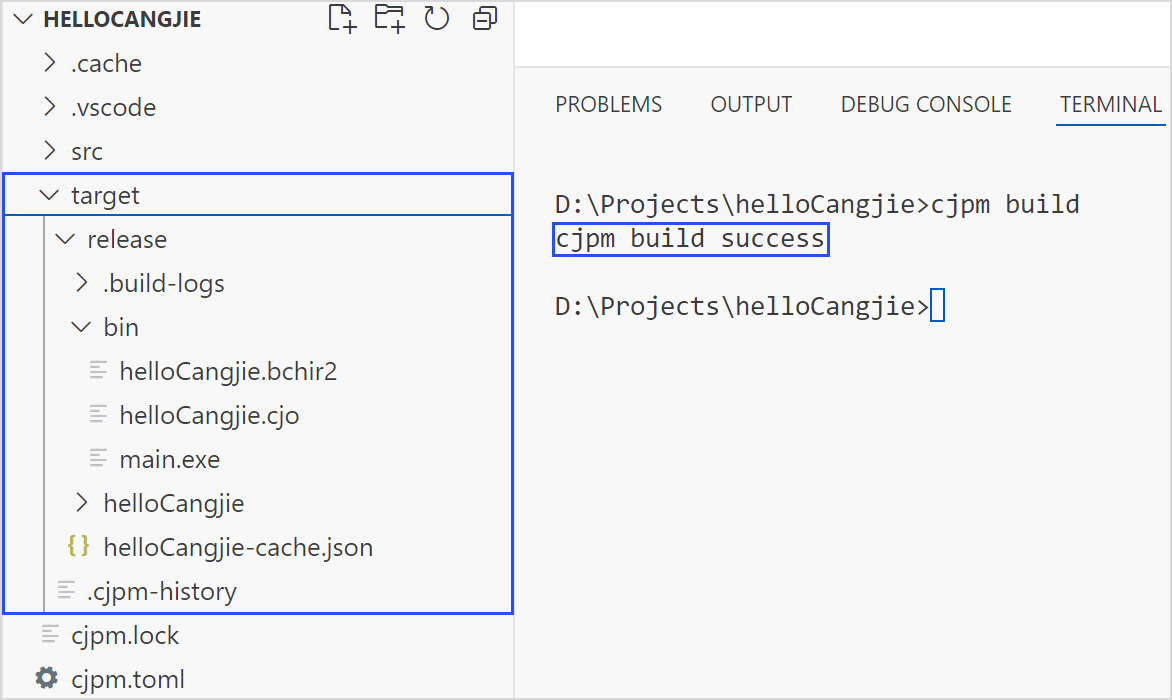
After parallel compilation is performed, the
targetdirectory is generated in the project folder. Areleasefolder is available in thetargetdirectory. Thereleasefolder contains three directories:.build-logsdirectory,bindirectory, and a directory with the same name as the project. Thebindirectory stores executable files (the executable files are generated only whenoutput-typeofcjpm.tomlis set toexecutable). The directory with the same name as the project stores the intermediate files generated during compilation.The information about whether the compilation is successful is displayed on the output panel.
-
Select
Cangjie: Build With Verboseto perform compilation and display compilation logs.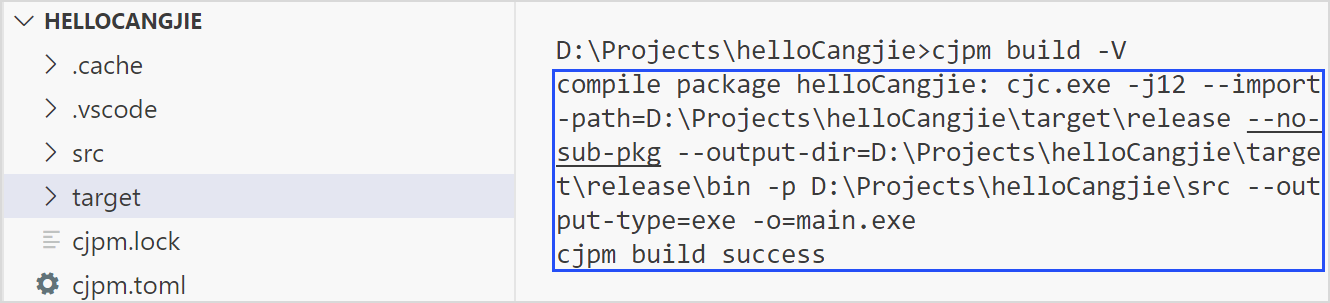
In addition to compilation, this compilation parameter also prints compilation logs.
-
Select
Cangjie: Build With Debugto generate the target file of the debug version.The compilation result of this command contains debug information for debugging.
-
Select
Cangjie: Build With Coverageto generate coverage information.The compilation result of this command contains coverage information.
-
Select
Cangjie: Build With Aliasto perform compilation and specify the name of the output executable file.
After you run this command and press Enter, an input box is displayed. You need to assign a new name to the project compilation result. This command is valid only when
output-typeofcjpm.tomlis set toexecutable. -
Select
Cangjie: Build With Incrementto perform incremental compilation.This command is used to specify incremental compilation.
-
Select
Cangjie: Build With CustomizedOptionto transparently transmit commands in thecjpm.tomlfile by condition.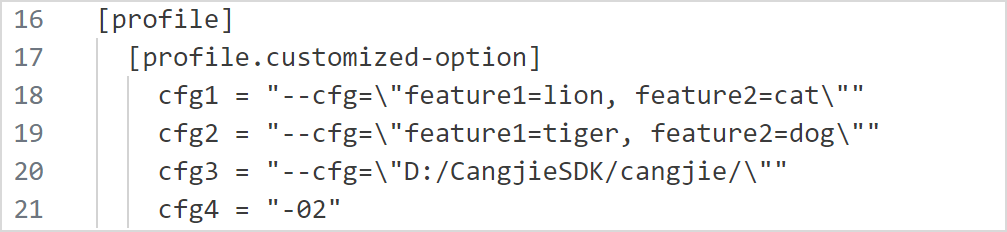
To use this option, you need to configure the
customized-optionfield in thecjpm.tomlfile, enterBuild With CustomizedOptionon the command panel, and press Enter to select the required parameters. You can select multiple parameters.
If the
customized-optionfield is not configured incjpm.tomland this command is executed, the plug-in prompts you to configure the field first. -
Select
Cangjie: Build With TargetDirto perform compilation and generate the compilation product in the specified path.After this command is executed, you can specify the output path of the compilation product. If you do not specify the path, the path specified by the
target-dirfield incjpm.tomlis used by default.
If the entered path is different from that specified by the
target-dirfield in cjpm.toml, a message is displayed, asking you whether to overwrite thetarget-dirfield in cjpm.toml. If you select Yes, thetarget-dirfield in cjpm.toml is overwritten by the entered value.
After the command is executed successfully, the compilation product is generated in the specified path.
-
Select
Cangjie: Build With Jobsto customize the maximum concurrency before compilation.You can run this command to customize the maximum concurrency before compilation. The input parameter can be any number in the range of (0, Number of CPU cores x 2].
If you enter a non-digit number in the input box, the operation is terminated, along with the message "Invaild input! The input should be number."
If the value entered in the input box exceeds the supported range (0, Number of CPU cores x 2], the number of CPU cores is used by default, and an alarm is displayed indicating that the value is out of the range.
-
Select
Cangjie: Build With MultiParameterto perform multi-parameter compilation.Multiple parameters can be added for compilation of a Cangjie project. After the
Build With MultiParametercommand is found on the command panel, select the parameters to be added. Whether to display the--targetparameter depends on thecross-compile-configurationfield incjpm.toml. If you do not configurecross-compile-configuration, the--targetoption is hidden. Whether to display the--<customized-option>parameter depends on thecustomized-optionfield in cjpm.toml. If you do not configurecustomized-option, the--<customized-option>option is hidden.
Select the parameters to be added, and then press Enter or click OK. You can also click the left arrow on the page to reselect compilation parameters.
If
cjpm build --output=<name>is selected, you need to enter an alias string and press Enter to run the command.
If
cjpm build --target=<name>is selected, you can select a platform for cross compilation.If
cjpm build --<customized-option>is selected, you can select the transparent transmission parameter.
The compilation result of the add command is the sum of the execution results of these commands.
-
Select
Cangjie: Update Cjpm.tomlto update the cjpm.lock file.After modifying the
cjpm.tomlfile, you need to run this command to update thecjpm.lockfile. If you modify thecjpm.tomlfile on the UI, you do not need to manually perform this operation. -
Select
Cangjie: Execute Test Fileto compile the unit test product, execute the corresponding unit test case, and print the test result. -
Select
Cangjie: Test With NoRunto compile the corresponding test product. -
Select
Cangjie: Test With SkipBuildto execute the test product if the test product exists. -
Select
Cangjie: Test With Jobsto customize the maximum concurrency before executing the unit test. The operation is the same asBuild With Jobs. -
Select
Cangjie: Test With MultiParameterto execute the unit test with multiple parameters.After the command is selected, enter the path of the package to be tested. If you do not need to specify it, press Enter. You can implement a multipacket concurrent unit test by entering the paths of multiple packages and separating them with spaces.

Select the parameters to be added.
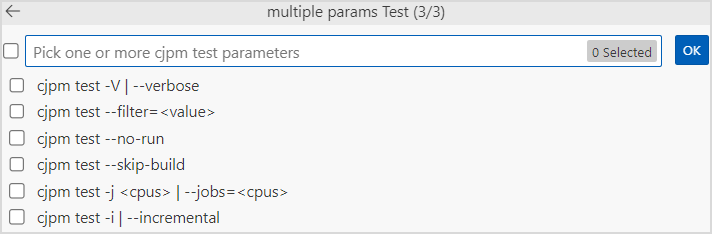
If
--filter=<value>is selected, you need to enter the expression for filtering the test subset.
The complete
cjpm testcommand can be executed after the expression for filtering the test subset is entered. The execution result is displayed on the Output panel.If
cross-compile-configurationandcustomized-optionare configured in the cjpm.toml file,--target=<name>and--<customized-option>are available.
If
--target=<name>is selected, you need to select the corresponding platform.
The
--targetparameter can be set toaarch64-hm-gnuonly on the SUSE platform.If
--<customized-option>is selected, you need to select customized options.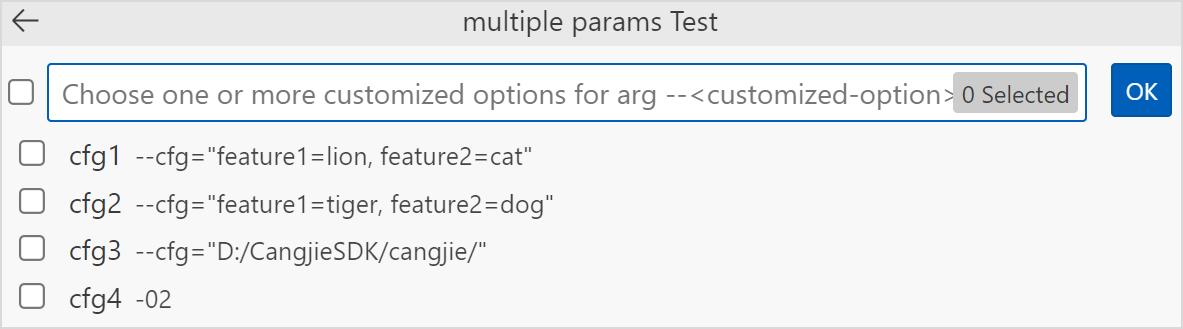
-
Select
Cangjie: Clean Build Resultto clear the compilation result (in the build directory of the project). -
Select
Cangjie: Check Circular Dependenciesto detect file dependencies. -
Select
Cangjie: Edit Configuration (UI)to open the configuration UI.
Running Commands on the Terminal
You can run the cjpm command on the VSCode terminal panel to compile a Cangjie project. If it is the first time that you use VSCode, you need to restart the VSCode to perform the cjpm operation on the terminal.

Clicking the Run Button to Run a Project
You can click the Run button in the .cj file editing area to run the entire Cangjie project.

If output-type is set to executable for the entire project, the running result is displayed on the terminal panel. Otherwise, only the compilation result is displayed.
The compilation process executed by clicking the Run button is based on the configurations of the cjpm.toml file and cjpm_build_args.json.
Clicking the Hammer Button to Compiling a Project
You can click the Hammer button in the .cj file editing area to compile the entire Cangjie project.

The compilation process performed by clicking the Hammer button is the same as that performed by clicking the Run button, and is also performed based on the configurations of the cjpm.toml file and cjpm_build_args.json. The difference is that if output-type is set to executable for the entire project, the entire project is executed after the compilation performed by clicking the Run button is complete, whereas the project is not executed after the compilation performed by clicking the Hammer button is complete.
Configuring Build Parameters in a Visualized Style
During compilation, you need to configure the cjpm.toml and cjpm_build_args.json files in the project directory in one of the following ways.
- Directly modify the
cjpm.tomlandcjpm_build_args.jsonfiles.

- Press F1 or press Ctrl + Shift + P (Command + Shift + P for macOS) to open the command panel. Run the
Cangjie: Edit Configuration (UI)command on the command panel to open the visualized edit UI.

- Click the brush icon in the upper right corner of the edit page to go to the visualized edit UI.

For the cjpm_build_args.json configuration in the .vscode directory of the project file, you can check or enter the parameters to be used for compilation. The modifications are synchronized to the cjpm_build_args.json file.
For the cjpm.toml file configuration in the project, you can enter the content and move the cursor out of the input box for the configuration to take effect in the cjpm.toml file.
Note:
When the
cjpm.tomlfile and parameter configuration UI of the Cangjie project are displayed in the editing area of VSCode at the same time, modifications to thecjpm.tomlfile are not synchronized to the UI.
For the build parameter cross-compile-configuration, you can click Add Configuration in cross-compile-configuration to add options.
Set key and compile-option, and click the Tick button or press Enter to synchronize with the cjpm.toml file. To delete a configuration, click the Cross button corresponding to the configuration.
If you click the Tick button or press Enter without setting the first field key in the added configuration, a message is displayed, indicating that the first field needs to be set. In this scenario, the submitted content is not synchronized to the cjpm.toml file. The configuration remains on the UI until the UI is refreshed. The content keeps consistent with that in the cjpm.toml file. package-configuration is similar to cross-compile-configuration. The following figure shows the scenario where the first field is empty in an added configuration of package-configuration.

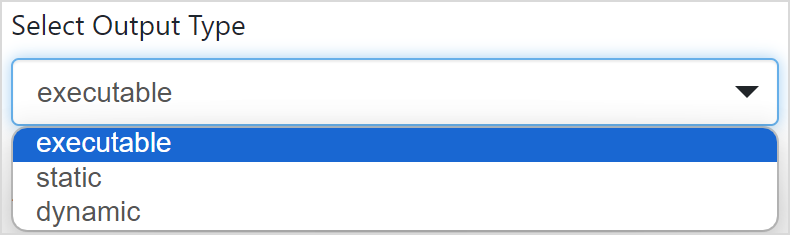
The methods for adding and modifying the package-configuration parameter is the same as those for cross-compile-configuration. The output-type field includes the following drop-down list options: executable, static, dynamic, and null. The initial type of an added configuration field is null. You can select a value as required. If the type is null, the field is deleted after it is synchronized to the cjpm.toml file.
Note:
When you configure the
cjpm.tomlfile on the UI, only the equal mark (=) in the--cfgpath configured in thecustomized-optionparameter need to be escaped, and other characters do not need to be escaped. However, you need to add escape characters when directly configuring thecjpm.tomlfile. For example, when configuringcompile-optionfor p1 of thepackage-configurationfield, on the UI, you only need to add quotation marks to the value of--link-options, that is,--link-options="-rpath=xxx"; in the cjpm.toml file, you need to set the value to--link-options=\"-rpath=xxx\". If the--cfgpath configured for thecustomized-optionparameter on the UI contains an equal mark (=), on the UI, the equal mark (=) needs to be escaped, that is,--cfg="D:/projects/cang\=jie"; in the cjpm.toml file, you need to fill in--cfg=\"D:/projects/cang\\=jie\".
The methods for adding and modifying the customized-option parameter is the same as those for cross-compile-configuration.
Note:
Built-in conditions cannot be set for conditions of
customized-option(@When[os = = "Linux"] cannot be used as a condition ofcustomized-option, that is, "cfg1" : "--cfg ="os=Linux"" is not allowed). Only customized conditions can be added. For details, see Conditional Compilation in Cangjie > Language Guide.
Importing Third-Party Libraries
Import Method
Note:
Third-party libraries can be imported only to the main module of the currently opened Cangjie project. For other sub-modules, the third-party libraries can be opened as projects for use.
In the Cangjie project, you can import third-party libraries and perform configuration in the cjpm.toml file.
dependencies: specifies projects on which the current Cangjie module depends. It contains the configuration information of other modules required for the current build, including the version number and path. Both of the two options need to be configured. Otherwise, the execution fails and an error is reported. You are advised to use this method to import project dependencies.
dev-dependencies: has the same usage and format as the dependencies field. This field specifies the dependencies used only during development, not the dependencies required for building the main project, for example, dependencies used only during testing. If the developer is the library author, this field should be used for dependencies that are not required by downstream users of the library.
bin-dependencies: imported as dependencies unless there are special requirements. Currently, the Cangjie plug-in supports only local bin-dependencies configuration.
Currently, package of Cangjie module dependencies can be imported in two ways. The following describes how to import three packages of the pro0 and pro1 modules.
test

├── pro0

│    ├── libpro0_xoo.so

│    ├── xoo.cjo

│    ├── libpro0_yoo.so

│    └── yoo.cjo

├── pro1

│    ├── libpro1_zoo.so

│    └── zoo.cjo

├── src

│    └── main.cj

└── cjpm.toml
Method 1: Import through package-option.
[target]
    [target.x86_64-w64-mingw32]
        [target.x86_64-w64-mingw32.bin-dependencies]
            [target.x86_64-w64-mingw32.bin-dependencies.package-option]
                pro0_xoo = "./test/pro0/xoo.cjo"
                pro0_yoo = "./test/pro0/yoo.cjo"
                pro1_zoo = "./test/pro1/zoo.cjo"
This option uses the map structure, where the name pro0_xoo is used as the key and corresponds to libpro0_xoo.so; and the path of the frontend .cjo file is used as the value. .a and .so corresponding to the .cjo file need to be placed in the same path, and the corresponding .cjo module file and the module name source file need to be placed in the same folder which cannot contain any other files or folders.
Method 2: Import through path-option.
[target]
    [target.x86_64-w64-mingw32]
        [target.x86_64-w64-mingw32.bin-dependencies]
            path-option = ["./test/pro0", "./test/pro1"]
This option is a string array structure where each element indicates the name of the path to be imported. cjpm automatically imports all Cangjie library packages meeting a specific rule in the path. The specific rule here is that the library name format is module name_package name. Packages whose library names do not meet the rule can be imported only through the package-option option.
If the same package is imported through package-option and path-option at the same time, the package-option field has higher priority.
The following figure shows the navigation bar view.
You can import the modules required by the project in the corresponding import mode subdirectories. On the navigation bar, click the brush icon to access the UI.

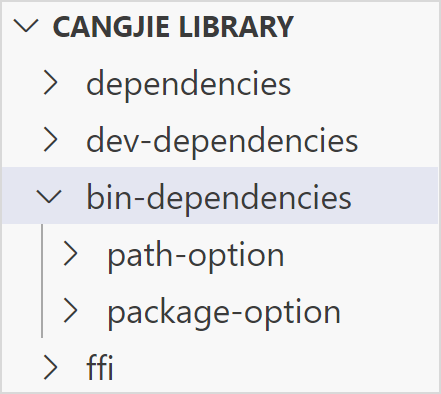
ffi: is an external C library on which the current Cangjie module depends. The information required for depending on the library is configured, including the name and path fields. CANGJIE LIBRARY in the view bar of the resource manager allows you to add such external libraries easily.
After the project is initialized, you can click the plus sign (+) next to the corresponding dependency type to add a third-party library.
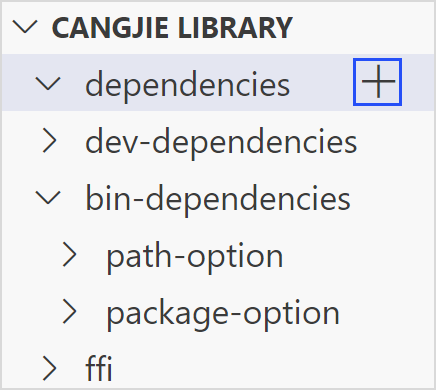
You can click the minus sign (-) on a third-party library to delete the library.
You can also click the Edit button in the view bar to open the third-party library import UI to import or delete a third-party library.

The preceding delete and add operations are all synchronized to the cjpm.toml file of the project.
Import Constraints
- If dynamic link libraries (C library and Cangjie library) are required for a project, you need to set
LD_LIBRARY_PATHand runexport LD_LIBRARY_PATH=xxx:$LD_LIBRARY_PATH. - The modification in the
cjpm.tomlfile does not directly affect treeView or UI. You need to click treeView or UI for manual update. - If you add an external library to the library category in treeView and the library category directory is closed, you need to open the directory to view the added external library.
- Currently, the fields on the UI do not support the function of displaying content on hover.
- The UI is not an external library added by developers, and its path is the same as that in the
cjpm.tomlfile. Absolute paths are displayed for libraries and treeViews added by developers.
Debug Service
Function Description
The Cangjie programming language provides a visualized debug service for developers to debug Cangjie programs. This plug-in provides the following functions:
- Launch: starts the debugging process.
- Attach: attaches to a started process.
- Supports source code breakpoints, function breakpoints, data breakpoints, and assembly breakpoints.
- Supports single-step debugging in source code, run to cursor, step-in, step-out, continue, pause, restart, and stop debugging.
- Supports Cangjie-C interoperability debug, continue Cangjie code, and step in C code.
- Supports single-step, step-in, and step-out in assembly.
- Supports expression evaluation.
- Supports viewing and modifying variables.
- Supports viewing variables on the debugging console.
- Supports viewing output information of programs to be debugged.
- Supports reverse debugging.
- Supports Unittest running and debugging.
Notes
- If you use the VSCode debug service for the first time, see the VSCode Debug Service User Guide.
- Currently, the debug service can be installed and used in VSCode of the Windows and Linux versions.
- Restricted by the debugger, if a conditional breakpoint exists in the loop code, the PAUSE operation may cause subsequent debugging to fail.
- Modifying variables in the VARIABLES view does not trigger update of the variables that have dependencies.
- If the debug service depends on the liblldb file in the Cangjie SDK package, you need to configure the Cangjie SDK path in advance.
- The debugging plug-in client communicates with the server through Socket. The plug-in automatically searches for an available port from port 9995 and starts the Socket server on 127.0.0.1 to listen on this port.
Starting Debugging
Launch Mode
Cangjie Project Debugging
- If the
launch.jsonfile is not created, choose Run and Debug > Cangjie(cjdb) Debug to start debugging. - If the
launch.jsonfile is created, in thelaunch.jsonfile, choose Add Configuration > Cangjie Debug (CJNative): launch > Build And Debug Cangjie Project to add debugging configurations and select the added configurations to start debugging.
Single File Debugging
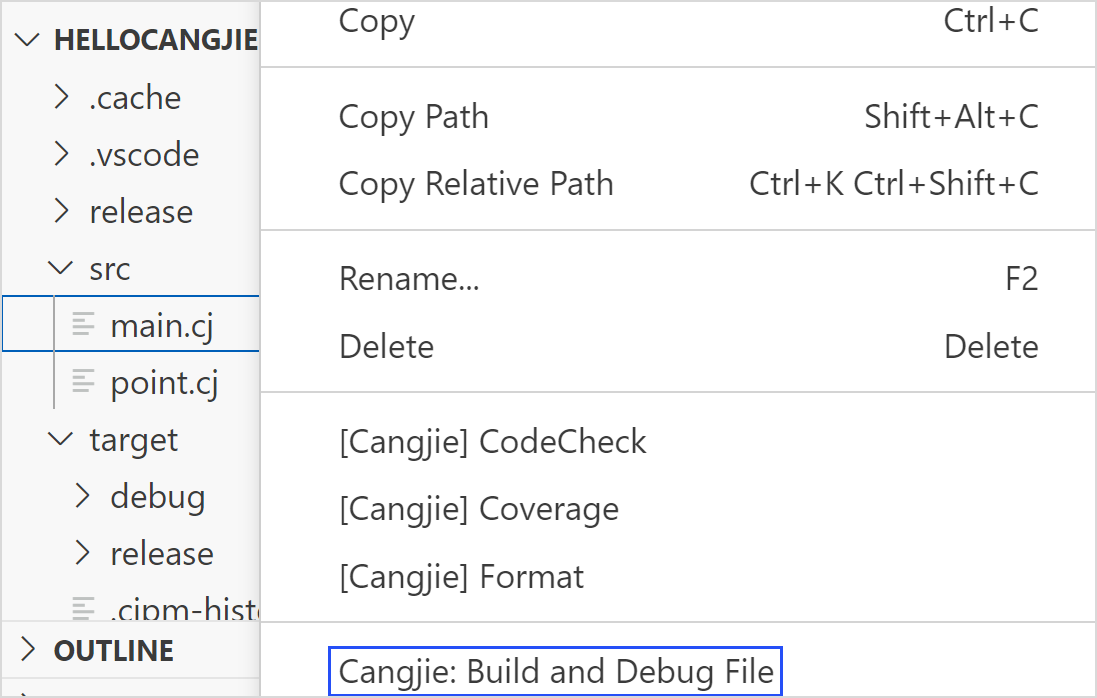
To debug a single file, right-click the Cangjie source file to be debugged and choose Cangjie: Build and Debug File from the shortcut menu. This operation generates the compilation configuration file task.json and compilation script, executes the script based on task.json configurations to compile a debuggable binary file, and then starts debugging.
Debugging a Manually Compiled Executable File
- Use the cjc compiler or cjpm to manually compile a debuggable binary file.
- Choose Run and Debug > Cangjie(cjdb) Debug > Cangjie (CJNative): launch > Choose Executable File Later to start debugging.
Debugging Macro-Expanded Code in Launch debugMacro Mode
Debug the code file (with the filename extension .marcocall) with the debug macro expanded. In this case, the original file corresponding to the macro cannot be debugged.
Debugging a Remote Process (from Linux to Linux)
During remote process debugging in launch mode, the debug service pushes the locally compiled binary file to the remote platform and then remotely debugs the binary file.
- Start lldb-server on the remote platform. You are advised to start the cjdb lldb-server in /cangjie/third_party/llvm/lldb/bin/lldb-server by running the command
/**/**/cangjie/third_party/llvm/lldb/bin/lldb-server p --listen "*:1234" --server. - Use the cjc compiler or cjpm to manually compile a debuggable binary file on the local host.
- Click Run and Debug to start debugging.
The following is a launch.json configuration example.
{
    "name": "Cangjie Debug (cjdb): test",
    "program": "/**/**/test",
    "request": "launch",
    "type": "cangjieDebug",
    "externalConsole": false,
    "remote": true,
    "remoteCangjieSdkPath": "/**/**/cangjie",
    "remoteFilePath": "/**/**/test",
    "remoteAddress": "1.1.1.1:1234",
    "remotePlatform": "remote-linux"
}
Configuration Attributes
| Attribute | Type | Description |
|---|---|---|
| program | string | Specifies the full path of the debugged process, for example, /home/cangjieProject/build/bin/main. The file is pushed to the remote platform. |
| remote | boolean | Starts the remote launch process. The value of remote is set to true. |
| remoteCangjieSdkPath | string | Specifies the path of the remote Cangjie SDK. |
| remoteFilePath | string | Specifies the full path for storing pushed files on the remote platform. Ensure that the path /home/test/ is valid and exists. main is the name of the file pushed to the remote platform. Example: /home/cangjieProject/build/bin/main. |
| remoteAddress | string | Specifies the IP address of the host where the debugged process is located and the listen port number of lldb-server, in the data format of ip:port. |
| remotePlatform | string | Specifies the remote platform. Only remote-linux is supported. |
| env | object | Sets the runtime environment variables for the program to be debugged. This configuration overwrites the system environment variables. To add configurations to the system configuration, append ${env:PATH} to the configuration item. For example: "PATH":"/home/user/bin: ${env:PATH}", "LD_LIBRARY_PATH":"/home/user/bin:${env:LD_LIBRARY_PATH}". |
Attach Mode
Debugging a Local Process
- In the
launch.jsonfile, choose Add Configuration > Cangjie Debug (CJNative) : attach to add debugging configurations, and select the added configurations to start debugging. - In the displayed dialog box, select the process to be debugged to start debugging.
Debugging a Remote Process
- Compile a debugable binary file on the local host and copy the file to the remote host.
- Start lldb-server on the remote host. You are advised to start cjdb lldb-server in /cangjie/third_party/llvm/lldb/bin/lldb-server by running the command
/**/**/cangjie/third_party/llvm/lldb/bin/lldb-server p --listen "*:1234" --server. - Start the binary file to be debugged on the remote host.
- Configure the
launch.jsonfile on the local host and start debugging.
launch.json configuration attributes:
{
    "name": "Cangjie Debug (cjdb): test",
    "processId": "8888",
    "program": "/**/**/test",
    "request": "attach",
    "type": "cangjieDebug",
    "remote": true,
    "remoteAddress": "1.1.1.1:1234",
    "remotePlatform": "remote-linux"
}
Configuration Attributes
| Attribute | Type | Description |
|---|---|---|
| processId | string | Specifies the PID of the process to be debugged. If the PID is configured, attach the PID first. If the PID is not configured, attach the program. |
| program | string | Specifies the full path of the debugged process, for example, /home/cangjieProject/build/bin/main. |
| remote | boolean | If configuration is to be attached to a local process, remote is set to false; if configuration is to be attached to a remote process, remote is set to true. |
| remoteAddress | string | Specifies the IP address of the host where the debugged process is located and listen port number of lldb-server for remote debugging, in the data format of ip:port. |
| remotePlatform | string | Specifies the remote platform for remote debugging. Only remote-linux is supported. |
Viewing Debugging Information
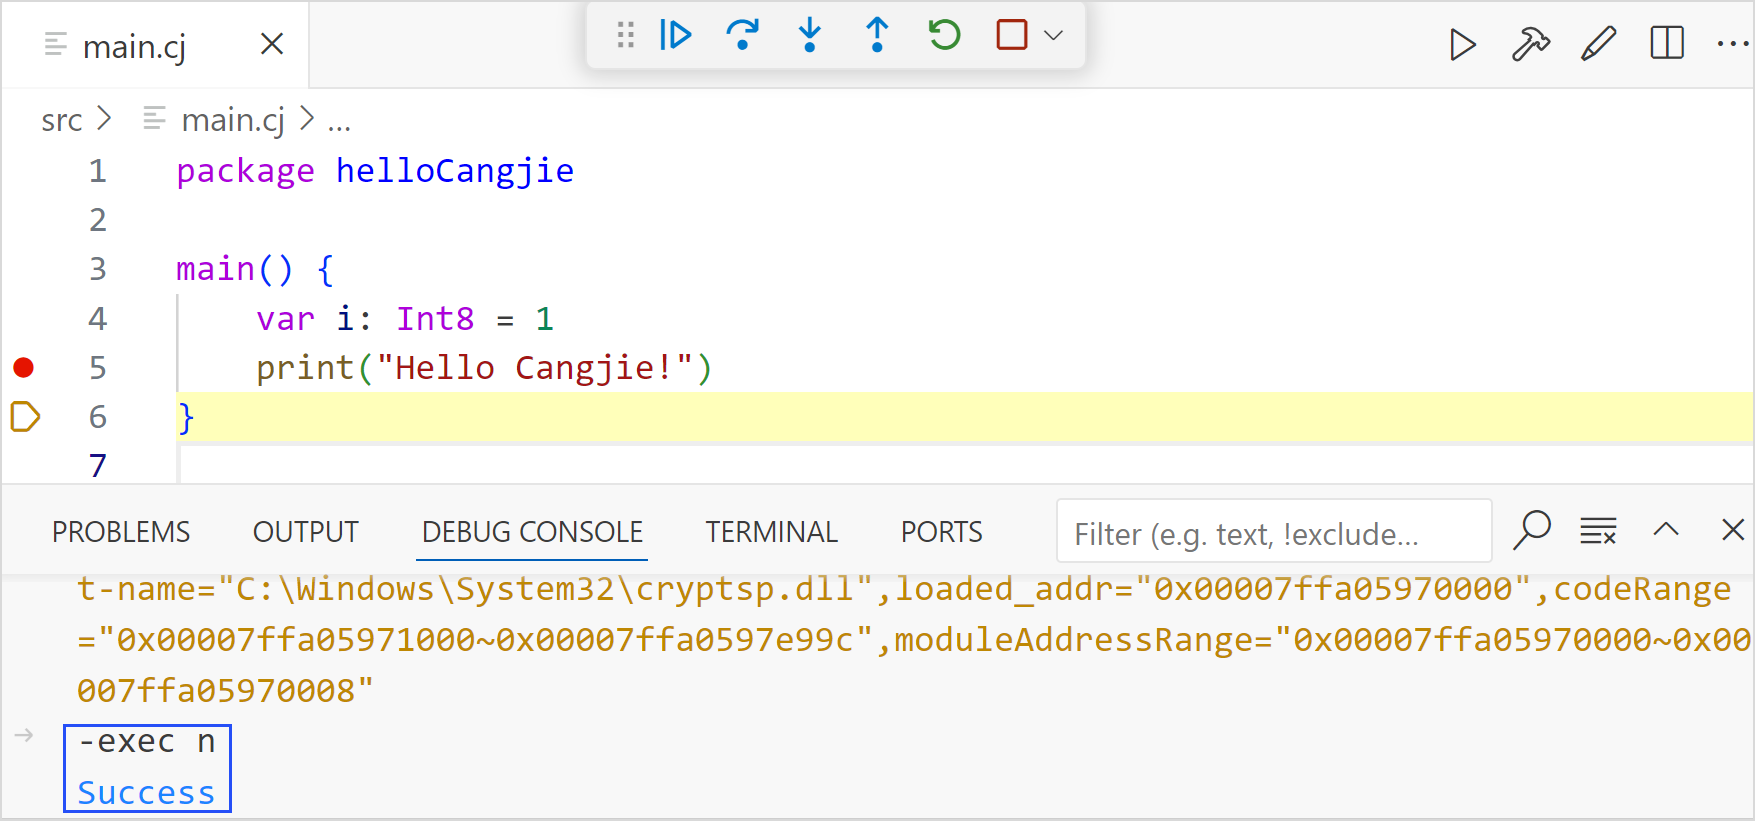
When a process is in the stopped state, you can view breakpoints, current threads, stack information, and variables on the left side of the VSCode UI. You can edit breakpoints and modify variables. You can also move the cursor over a variable name in the Editor window to view the variable value. You can view the output information of the program to be debugged in the TERMINAL window.

Expression Evaluation
- In the WATCH window, click Add or double-click in the blank area, and enter an expression.
- Enter an expression in the Debug Console window.
- In the Editor window, double-click a variable, right-click the variable, and choose Evaluate in Debug Console from the shortcut menu.
Program Control
-
Click the icons on the top debugging toolbar to control a program, including running in single step, stepping in, stepping out, continuing, pausing, restarting, or stopping the program.

-
Right-click at the cursor and choose Run to Cursor from the shortcut menu.

-
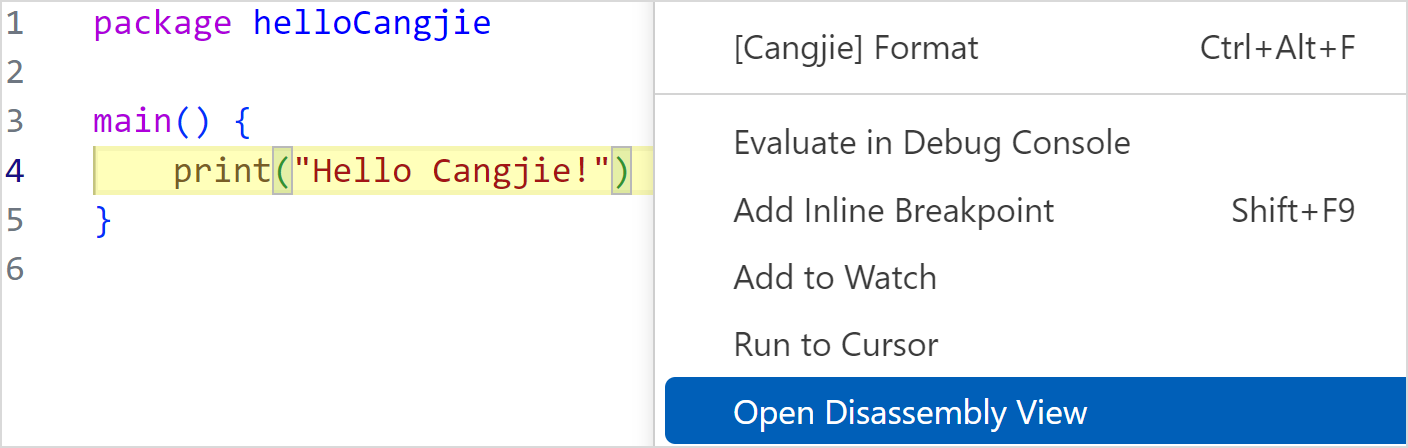
Right-click in the source code view and choose Open Disassembly View from the shortcut menu.
Debugging Console
Running cjdb Commands
Enter cjdb commands on the debugging console to debug a program. The command needs to start with -exec. The subcommand to be executed needs to be a correct cjdb command.
The following is an example of running the cjdb command n to perform single-step debugging:
-exec n
Viewing Variables
Enter a variable name on the debugging console to view the variable value.

Reverse Debugging
Note
- Reverse debugging is based on record replay. After the reverse debugging function is enabled, the debug service records all stop points (breakpoints and single steps) of forward debugging and debugging information such as threads, stacks, and variables at the stop points. In reverse debugging mode, you can view the debugging information of historical record points.
Configuration
Click the gear icon in the lower left corner, select Settings, enter cangjie in the search box, find Reverse Debug, and check Enable reverse debug to enable automatic recording of historical stop points of program debugging. In addition, you can configure the number of automatically recorded threads, number of stacks, variable scope, number of expansion layers of sub-variables of complex variables, and number of sub-variables. After the configuration is modified, restart the Cangjie debugging console.

Toolbar
Click the clock icon on the top debugging toolbar to enter the reverse debugging mode. Use the forward/reverse continue and forward/reverse single-step to control a program on the toolbar to view historical thread, stack, and variable information, as shown in the following figure.

Click the block icon on the top debugging toolbar to exit the reverse debugging mode. The debugging returns to the last stop point of the forward debugging, as shown in the following figure.

Reverse Breakpoint
Notes:
- The reverse breakpoint is a special source code log point. Forward debugging does not stop, and no log messages for logging reverse breakpoints are automatically generated during this process.
- During forward debugging, you can set a reverse breakpoint in advance. The debug service background records the debugging information of the reverse breakpoints of the process.
- In reverse debugging mode, a reverse breakpoint is used as a stop point (breakpoint type). You can view the debugging information such as thread stack variables at the breakpoint.
- In reverse debugging mode, reverse breakpoints cannot be set.
Reverse breakpoint setting mode:
-
Right-click in the Cangjie source file editor view and choose Cangjie: Add Reverse Breakpoint from the shortcut menu to set a reverse breakpoint for the line where the cursor is located.

-
Right-click the Cangjie source file and choose Cangjie: Add Auto Reverse Breakpoints from the shortcut menu. The plug-in analyzes the entry and exit positions of the functions in the file and automatically sets reverse breakpoints.

-
Right-click a folder and choose Cangjie: Add Auto Reverse Breakpoints from the shortcut menu. The plug-in analyzes the entry and exit positions of the functions in the Cangjie source file in the folder and automatically sets reverse breakpoints.

Timeline
Note:
The timeline displays all stop points (breakpoints and single steps) recorded in reverse debugging mode. You can drag the timeline to view historical stop points.
The entry of the timeline is in the lower right area of VSCode. You can right-click the tab line in the lower right area and choose Cangjie Debug Timeline from the shortcut menu to enable or disable the timeline, as shown in the following figure. You can also choose View > Open View to enable the timeline.

- There are left and right cursors on the main timeline. You can drag the left and right cursors to select a time area. After an area is selected, the cursor changes to a hand shape when it is placed above the selected area. In this case, you can drag the area leftward or rightward.
- Place the cursor on the main timeline. When the cursor changes to a cross, hold down the cursor and drag it forward or backward to set the area that the cursor is moved over to a new time area.
- You can hold down Ctrl and scroll the mouse wheel to zoom in or zoom out the selected area.
- Each timeline identifies a Cangjie thread or system thread.
When you click a record point on the timeline, the editor view is refreshed synchronously (locating the source code line), and the debugging information view is refreshed synchronously (displaying the thread, stack frame, and variables of the record point).
Running and Debugging unittest
Prerequisites
The unit test code of a module is in the following structure: The .cj file indicates the source code of a package, and the name of the corresponding unit test code file ends with _test.cj. For details about how to write the unit test code, see the standard library user manual.
├── src

│    ├── koo

│    │   ├── koo.cj

│    │   └── koo_test.cj

│    ├── zoo

│    │   ├── zoo.cj

│    │   └── zoo_test.cj

│    ├── main.cj

│    └── main_test.cj

└── cjpm.toml
How to Use
- Click the Run button on the
@Test/@TestCasedeclaration line to run the unit test class or unit test case. - Click the Debug button on the
@Test/@TestCasedeclaration line to debug the unit test class or unit test case.

DAP Communication Log
The debugging service client communicates with the server using the DAP protocol. Communication logs can be used to locate faults. The log path is /.cangjie/debug/logs/server.
You can click the gear icon in the lower left corner, choose Settings, enter cangjie in the search box, find Debug, and select Enable DAPCommunication Log to enable service communication log debugging.

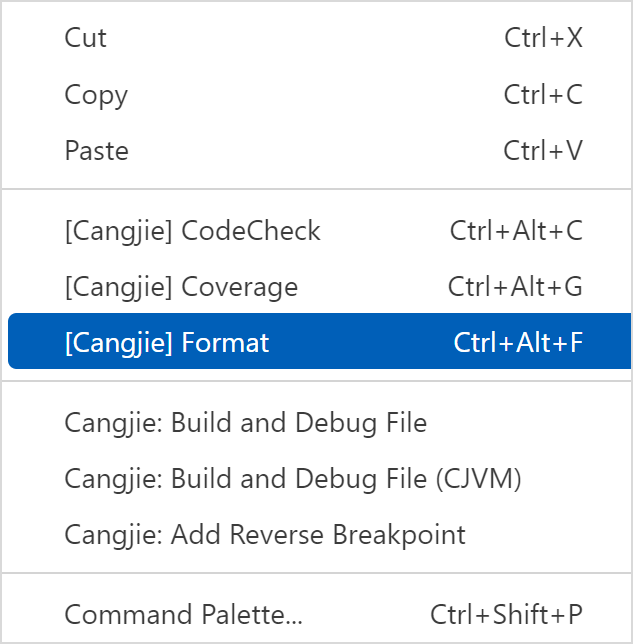
Formatting
To format a Cangjie file, right-click the code editing area in VSCode and choose [Cangjie] Format from the shortcut menu or press Ctrl + Alt + F to run the formatting command, as shown in the following figure.
For the Cangjie project, you can select a file in the resource manager of VSCode or right-click a folder and choose [Cangjie] Format from the shortcut menu to format the selected file or folder, as shown in the following figure.

Coverage Statistics
The coverage statistics function is used to generate the coverage report of the Cangjie language program.
Note:
If the selected folder does not contain a Cangjie file, no coverage report is generated.
You can start coverage statistics in two ways.
-
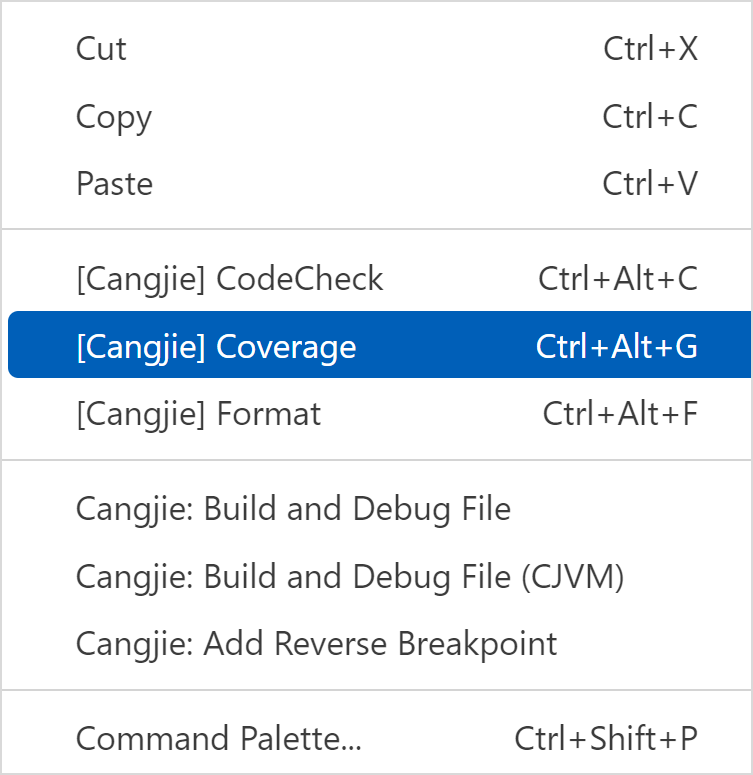
Right-click the code editing area of VSCode and choose [Cangjie] Coverage from the shortcut menu, or press Ctrl + Alt + G to run the command for generating the coverage report of the current Cangjie file, as shown in the following figure.
-
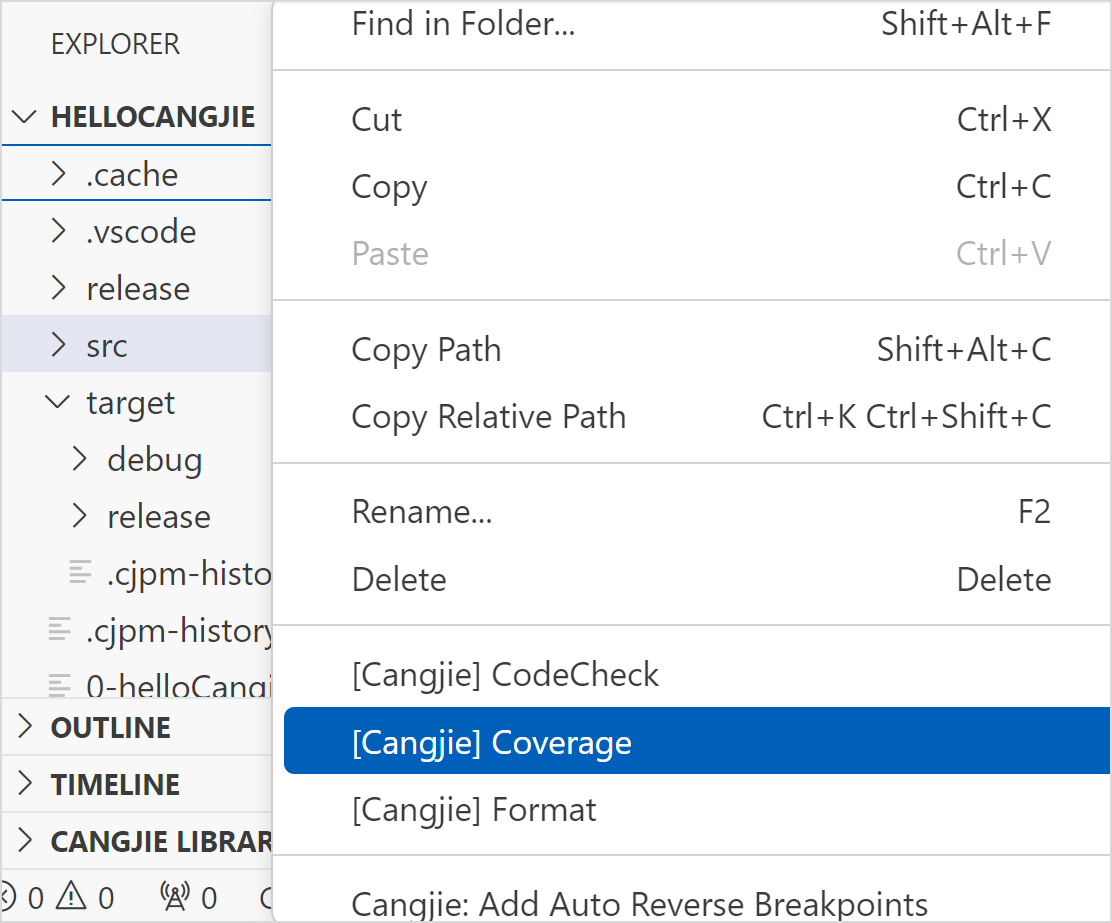
In the resource manager of VSCode, select a file or right-click a folder and choose [Cangjie] Coverage from the shortcut menu to generate a coverage report for the selected file or folder, as shown in the following figure.
On the generated coverage report page, you can click the file name to view the coverage details.